Forgotten Tunnels: Difference between revisions
imported>An Adventurer m (on map point, replaced 3 med markers with 1 dungeon marker using average of coords since entrances are so close) |
imported>Immortalbob No edit summary |
||
| (13 intermediate revisions by 4 users not shown) | |||
| Line 4: | Line 4: | ||
| Updated = | | Updated = | ||
| | | | ||
| Live Image = | | Live Image = Forgotten Tunnels Entrances Live.jpg | ||
| Live Image Caption = | | Live Image Caption = The three burrow entrances to the dungeon. | ||
| | | | ||
| Wiki Map File = 8B02 | | Wiki Map File = 8B02.png | ||
| Wiki Map Two = | | Wiki Map Two = | ||
| | | | ||
| Coordinates = 92.9S, 56.4W<br>93.1S, 56.9W<br>93.6S, 56.6W | | Coordinates = 92.9S, 56.4W<br>93.1S, 56.9W<br>93.6S, 56.6W | ||
| Landblock = | | Landblock = 8B02 | ||
| Dereth Map = | | Dereth Map = {{Map Point|93.2|S|56.6|W|Marker=Dungeon}} | ||
{{Map Point|93.2|S|56.6|W|Marker=Dungeon}} | | Nearest Town = Candeth Keep | ||
| Nearest Town = | |||
| Nearest LS = | | Nearest LS = | ||
| Route = | | Route = See [[Moarsman City]] | ||
| Level Restrictions = 180 | | Level Restrictions = 180 | ||
| Tieable = | | Tieable = | ||
| Recallable = | | Recallable = | ||
| Summonable = | | Summonable = | ||
| Lifestone if Log = | | Lifestone if Log = | ||
| Quest Flag = | | Quest Flag = | ||
}} | }} | ||
== | == Notes == | ||
There are three portals in bunkers close to each other that all lead to this dungeon, but each portal drops you in a different part of the dungeon. Which you use doesn't really matter (you travel in a full circle around the dungeon). | |||
The lever doors next to each drop into the dungeon are all opened by handing in the 4 gems to the field generators and using the energy ring. This starts a five minute timer, after which the six doors open (2 by each drop point). This gives you enough time to run back to the dungeon if using the stronghold statue (the doors remain open for 3–5 minutes). | |||
Must be a Lord in your society to access. | |||
== Maps == | == Maps == | ||
* Wiki Map: | * Wiki Map: | ||
:[[File: | <div style="overflow:hidden">[[File:8B02.png|200px]]</div> | ||
== NPCs == | == NPCs == | ||
* | * None | ||
== Creatures == | == Creatures == | ||
{ | {|cellpadding=5 | ||
|-valign=top | |||
| | |||
{{Creature Class|Blighted Moarsman | {{Creature Class|Blighted Moarsman | ||
| Location = Dungeon | | Location = Dungeon | ||
| Line 51: | Line 48: | ||
| Guardian Moarsman | | Guardian Moarsman | ||
}} | }} | ||
{{Creature Class|Golem | {{Creature Class|Golem | ||
| Location = Dungeon | | Location = Dungeon | ||
| Corrupted Coral Golem | | Corrupted Coral Golem | ||
| Guardian Golem (215) | | Guardian Golem (Level 215) | ||
| Guardian of The Secret Keeper | |||
}} | |||
| | |||
{{Creature Class|Sclavus | |||
| Location = Dungeon | |||
| Sclavus Acolyte of T'thuun | |||
| Guardian Sclavus | |||
}} | |||
{{Creature Class|Slithis | |||
| Location = Dungeon | |||
| Sishalti Tendril | |||
| Sishalti Tentacle | |||
| Sishalti Eye Stalk | |||
}} | |||
{{Creature Class|Undead | |||
| Location = Dungeon | |||
| The Secret Keeper | |||
}} | }} | ||
|} | |||
== Items and Objects == | == Items and Objects == | ||
* {{ | * {{Itemlink|Key (Guardian Sclavus)}} - Dropped by [[Guardian Sclavus]]. (2 uses) | ||
* {{ | * {{Itemlink|Key (Guardian Moarsman)}} - Dropped by [[Guardian Moarsman]]. (2 uses) | ||
* {{ | * {{Itemlink|Key (Guardian Golem) }} - Dropped by [[Guardian Golem (Level 215)]]. (2 uses) | ||
* {{ | * {{Itemlink|Purple Energy Crystal}} - In locked rooms opened by [[Key (Guardian Sclavus)]]. (13 day pickup timer, note there are two unique purple crystals, you need both) | ||
* {{ | * {{Itemlink|Orange Energy Crystal}} - In locked rooms opened by [[Key (Guardian Moarsman)]]. (13 day pickup timer, note there are two unique orange crystals, you need both) | ||
* {{ | * {{Itemlink|Energy Field Generator}} | ||
* {{ | * {{Itemlink|Energy Ring}} - Obtained by using the ring in the middle bottom of the Slithis pit room in the middle of the dungeon (you must first turn in all 4 gems to drop the energy fields). | ||
* {{ | * {{Itemlink|Glimmering Shard}} - Dropped by [[The Secret Keeper]]. (Drops 9, 13 day timer) | ||
== Portals == | == Portals == | ||
* | * None | ||
== Images == | == Images == | ||
Click image for full size version. | Click image for full size version. | ||
<gallery heights=200px> | <gallery widths=200px heights=200px perrow=3> | ||
File:Energy Field Generator Live.jpg|Energy Field Generator | |||
File:Energy Ring Live.jpg|Energy Ring | |||
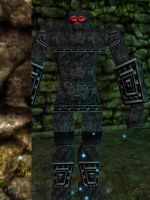
File:Guardian of The Secret Keeper Live.jpg|[[Guardian of The Secret Keeper]] | File:Guardian of The Secret Keeper Live.jpg|[[Guardian of The Secret Keeper]] | ||
File:The Secret Keeper Live.jpg|[[The Secret Keeper]] | File:The Secret Keeper Live.jpg|[[The Secret Keeper]] | ||
File:Forgotten Tunnels Spikes Live.jpg|Good thing you can't land here | |||
</gallery> | </gallery> | ||
Latest revision as of 17:20, 27 June 2017
| Maps NPCs Creatures Items and Objects Portals Images Update History |
| Forgotten Tunnels | |
|---|---|
| Quests | Forgotten Tunnels of Nyr'leha |
| Restrictions | Level: 180 Tieable: No Recallable: No Summonable: No |
| Coordinates | 92.9S, 56.4W 93.1S, 56.9W 93.6S, 56.6W near Candeth Keep |
| Nearest LS | ?? |
| Route | See Moarsman City |
| Map Files: | Wiki Map |
Show location on Dereth map
| |
| 8B02 | |


Notes
There are three portals in bunkers close to each other that all lead to this dungeon, but each portal drops you in a different part of the dungeon. Which you use doesn't really matter (you travel in a full circle around the dungeon).
The lever doors next to each drop into the dungeon are all opened by handing in the 4 gems to the field generators and using the energy ring. This starts a five minute timer, after which the six doors open (2 by each drop point). This gives you enough time to run back to the dungeon if using the stronghold statue (the doors remain open for 3–5 minutes).
Must be a Lord in your society to access.
Maps
- Wiki Map:

NPCs
- None
Creatures
Items and Objects
- Key (Guardian Sclavus) - Dropped by Guardian Sclavus. (2 uses)
- Key (Guardian Moarsman) - Dropped by Guardian Moarsman. (2 uses)
- Key (Guardian Golem) - Dropped by Guardian Golem (Level 215). (2 uses)
- Purple Energy Crystal - In locked rooms opened by Key (Guardian Sclavus). (13 day pickup timer, note there are two unique purple crystals, you need both)
- Orange Energy Crystal - In locked rooms opened by Key (Guardian Moarsman). (13 day pickup timer, note there are two unique orange crystals, you need both)
- Energy Field Generator
- Energy Ring - Obtained by using the ring in the middle bottom of the Slithis pit room in the middle of the dungeon (you must first turn in all 4 gems to drop the energy fields).
- Glimmering Shard - Dropped by The Secret Keeper. (Drops 9, 13 day timer)
Portals
- None
Images
Click image for full size version.
-
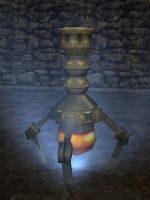
Energy Field Generator
-
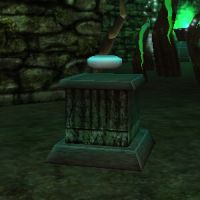
Energy Ring
-
-

-

Good thing you can't land here


