Monouga Laboratory (150+): Difference between revisions
From Drunkapedia
imported>Tlosk No edit summary |
imported>Immortalbob No edit summary |
||
| (One intermediate revision by one other user not shown) | |||
| Line 3: | Line 3: | ||
| Related Quests = [[Monouga Laboratory]] | | Related Quests = [[Monouga Laboratory]] | ||
| Updated = | | Updated = | ||
| | |||
| Live Image = Monouga Laboratory.jpg | |||
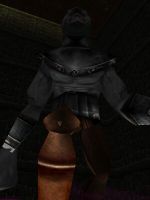
| Live Image Caption = Bell to ring for feeding time (summons portal once gem is given and then rung). | |||
| | | | ||
| Wiki Map File = 00A2.png | | Wiki Map File = 00A2.png | ||
| ACmaps.com ID = | | ACmaps.com ID = | ||
| Coordinates = 9.8S 81.0W<br />(Inside [[Monouga Feeding Pits]]) | | Coordinates = 9.8S 81.0W<br />(Inside [[Monouga Feeding Pits]]) | ||
| Landblock = 00A2 | |||
| Dereth Map = {{Map Point|9.8|S|81.0|W|Marker=Dungeon}} | |||
| Nearest Town = Fort Tethana | | Nearest Town = Fort Tethana | ||
| Nearest LS = 1.0N 70.7W | | Nearest LS = 1.0N 70.7W | ||
| Route = Run southwest from [[Fort Tethana]]. | | Route = Run southwest from [[Fort Tethana]]. | ||
| Level Restrictions = 150 | |||
| Level Restrictions = 150 | | Tieable = | ||
| Tieable = | | Recallable = | ||
| Recallable = | | Summonable = | ||
| Summonable = | | Lifestone if Log = | ||
| Lifestone if Log = | |||
| Quest Flag = Give [[Monouga Laboratory Portal Attunement Gem|Monouga Gem]] to bell before ringing. | | Quest Flag = Give [[Monouga Laboratory Portal Attunement Gem|Monouga Gem]] to bell before ringing. | ||
}} | }} | ||
== | == Notes == | ||
The portal to this dungeon opens for a brief period inside the [[Monouga Feeding Pits]] dungeon by first giving a [[Monouga Laboratory Portal Attunement Gem]] to the 150 Bell (north at the first intersection), then ringing the bell. | The portal to this dungeon opens for a brief period inside the [[Monouga Feeding Pits]] dungeon by first giving a [[Monouga Laboratory Portal Attunement Gem]] to the 150 Bell (north at the first intersection), then ringing the bell. | ||
Creatures respawn quickly ( | Creatures respawn quickly (2–3 minutes) and are the spawns are thick. Unless you have a large party it is probably easier to run rather than fight. | ||
There are no surface portals in this dungeon, you must run back if you die (you can get multiple gems by talking to the NPC in Cragstone several times, a new gem is needed each time to reopen the portal). | There are no surface portals in this dungeon, you must run back if you die (you can get multiple gems by talking to the NPC in Cragstone several times, a new gem is needed each time to reopen the portal). | ||
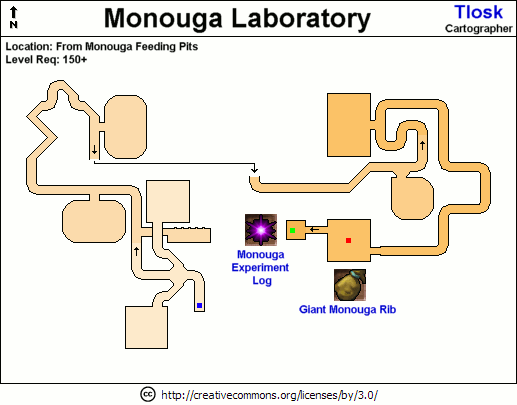
== Map == | == Map == | ||
[[File:00A2.png]] | [[File:00A2.png|200px]]</div> | ||
== Creatures == | == Creatures == | ||
| Line 61: | Line 54: | ||
| Virindi Paradox | | Virindi Paradox | ||
}} | }} | ||
== Items and Objects == | |||
* {{Itemlink|Monouga Experiment Log}} - See Map. | |||
* {{Itemlink|Giant Monouga Rib}} - 10 ribs dropped by the [[Giant Imprisoned Monouga]]. | |||
== Portals == | |||
* None | |||
== Images == | == Images == | ||
Click image for full size version. | Click image for full size version. | ||
<gallery heights=200px widths=200px perrow= | <gallery heights=200px widths=200px perrow=3> | ||
File: | File:Giant Imprisoned Monouga Live.jpg|Giant Imprisoned Monouga | ||
File:Image.jpg|Caption | File:Image.jpg|Caption | ||
</gallery> | </gallery> | ||
Latest revision as of 12:21, 3 July 2017
| Maps NPCs Creatures Items and Objects Portals Images Update History |
| Monouga Laboratory (150+) | |
|---|---|
| Quests | Monouga Laboratory |
| Restrictions | Level: 150 Quest Flagged Tieable: No Recallable: No Summonable: No |
| Coordinates | 9.8S 81.0W (Inside Monouga Feeding Pits) near Fort Tethana |
| Nearest LS | 1.0N 70.7W |
| Route | Run southwest from Fort Tethana. |
| Map Files: | Wiki Map |
Show location on Dereth map
| |
| 00A2 | |


Notes
The portal to this dungeon opens for a brief period inside the Monouga Feeding Pits dungeon by first giving a Monouga Laboratory Portal Attunement Gem to the 150 Bell (north at the first intersection), then ringing the bell.
Creatures respawn quickly (2–3 minutes) and are the spawns are thick. Unless you have a large party it is probably easier to run rather than fight.
There are no surface portals in this dungeon, you must run back if you die (you can get multiple gems by talking to the NPC in Cragstone several times, a new gem is needed each time to reopen the portal).
Map

Creatures
Items and Objects
- Monouga Experiment Log - See Map.
- Giant Monouga Rib - 10 ribs dropped by the Giant Imprisoned Monouga.
Portals
- None
Images
Click image for full size version.
-
Giant Imprisoned Monouga
-

Caption

