The Temple of Liazk Itzi: Difference between revisions
imported>Atarax No edit summary |
imported>Arkalor No edit summary |
||
| (33 intermediate revisions by 8 users not shown) | |||
| Line 1: | Line 1: | ||
{| | {{Links Header|'''[[Ancient Armor|Ancient Armor Quests]]''' | ||
| | |||
[[The Temple of Ixir Zi|Temple of Ixir Zi]] - Temple of Liazk Itzi - [[The Temple of Hizk Ri|Temple of Hizk Ri]] - [[The Temple of Kivik Lir|Temple of Kivik Lir]] - [[The Temple of Izji Qo|Temple of Izji Qo]]}} | |||
{{Quest Summary | |||
| nocat = true | |||
| Level = 40-59, 60-79, 80-99, 100 | |||
| Recommended Level = | |||
| Quest Type = Fellowship | |||
| Starts With = | |||
| Starts At = [[Antechamber of Liazk Itzi]] at 40.7S, 11.8E | |||
| Route = From [[Xarabydun]] or use a [[Fadsahil's Portal Gem]] | |||
| Repeat Timer = 20 Hours | |||
| Time to Complete = | |||
| Contracts = | |||
}} | |||
== Overview == | |||
More commonly known as Blackmire 2, this quest has four level ranges: 40 - 59, 60 - 79, 80 - 99, and 100+ | |||
* If you are soloing this quest you must be in a fellowship to claim the reward at the end. | |||
Prerequisites | |||
* Before heading out, buy 1 {{Itemlink|Dragonsblood}} from your local archmage. | |||
== | == Walkthrough & Notes == | ||
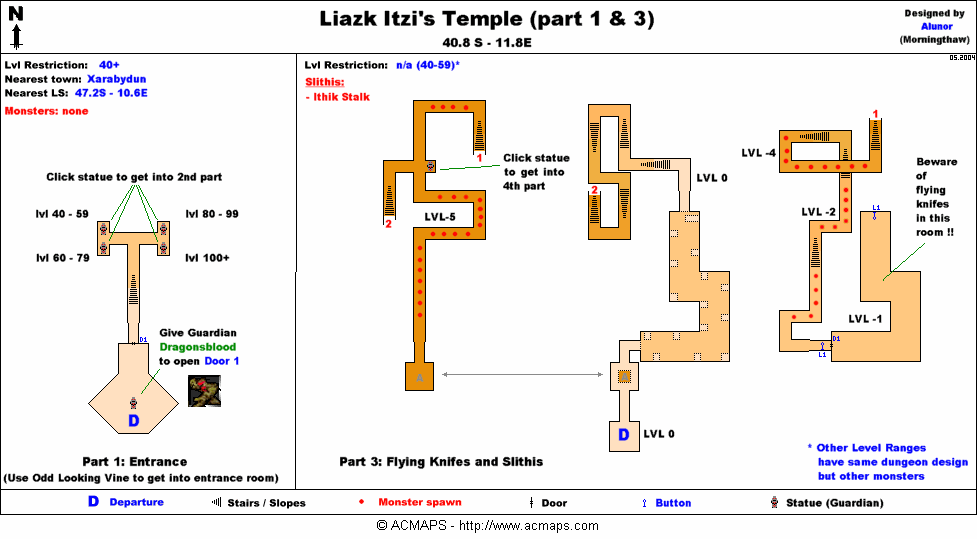
# Use the [[Odd Looking Vine]] to be teleported into the [[Antechamber of Liazk Itzi]]. | |||
=== Part 1 === | === Part 1: Antechamber of Liazk Itzi === | ||
# | # Hand your Dragonsblood to the statue and go through the door it opens. | ||
# | # There are 4 statues. Use the one designated for your level range to be teleported into [[Liazk Itzi Guardians]]: | ||
# | #* Northwest - Levels 40 to 59 | ||
# | #* Southwest - Levels 60 to 79 | ||
# | #* Northeast - Levels 80 to 99 | ||
#* Southeast - Levels 100 and up | |||
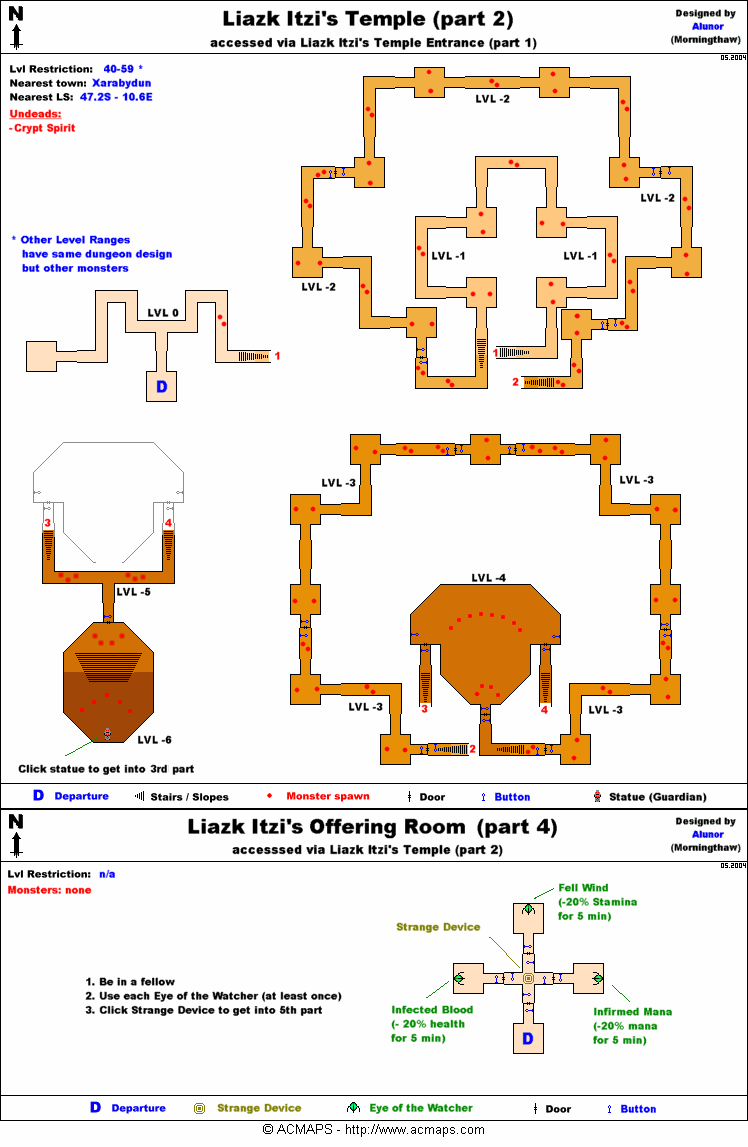
=== Part 2 === | === Part 2: Liazk Itzi Guardians === | ||
# | # At the entrance, take the first right. From then on there is only one path to the end. The dungeon is full of a single type of Falatacot undead: | ||
# | #* 40 - 59: [[Grave Spirit]] | ||
#* 60 - 79: [[Crypt Spirit]] | |||
#* 80 - 99: [[Restless Soul]] | |||
#* 100+: [[Ancient Soul]] | |||
# There are several doors opened by levers. The lever is always in the hallway very close to the door. Near the end you will come to a large room full of undead and two paths down. Both lead to the final room. Use the statue in this final room to be teleported to [[Lair of Liazk Itzi]]. | |||
=== Part 3 === | === Part 3: Lair of Liazk Itzi === | ||
# | # There are two options - jump down a hole and run past/fight a gauntlet of Slithis, or complete a jumping puzzle to avoid the monsters. Should you fall in the jumping puzzle, you will land in pit lined with flying dagger traps. There is a lever in the north end of the pit room will open a door to the south, and once out of the pit you'll have to fight slithis to reach the end of this section. | ||
#* 40 - 59: [[Ithik Stalk]] | |||
# | #* 60 - 79: [[Irkith Stalk]] | ||
#* 80 - 99: [[Irkith Stalk]] ? | |||
#* 100+: [[Slithis Spthis]] | |||
# After passing the jumping puzzle or creatures, use the statue at the intersection to be teleported to [[Liazk Itzi's Offering Room]]. | |||
== | === Part 4: Liazk Itzi's Offering Room === | ||
# This next area is a test of speed. The dungeon is small and contains no creatures. One person must use all three Eye statues fast enough to activate the [[Strange Device (Blackmire)|Strange Device]]. | |||
#* {{Tip}} After using an eye, jump to break the animation and exit the room before the door closes. Being in combat or casting mode when using the eye will achieve this effect as well. | |||
# When the three eyes have been used fast enough, use the strange device and all members of the fellowship will be teleported to [[Halls of Liazk Itzi]]. | |||
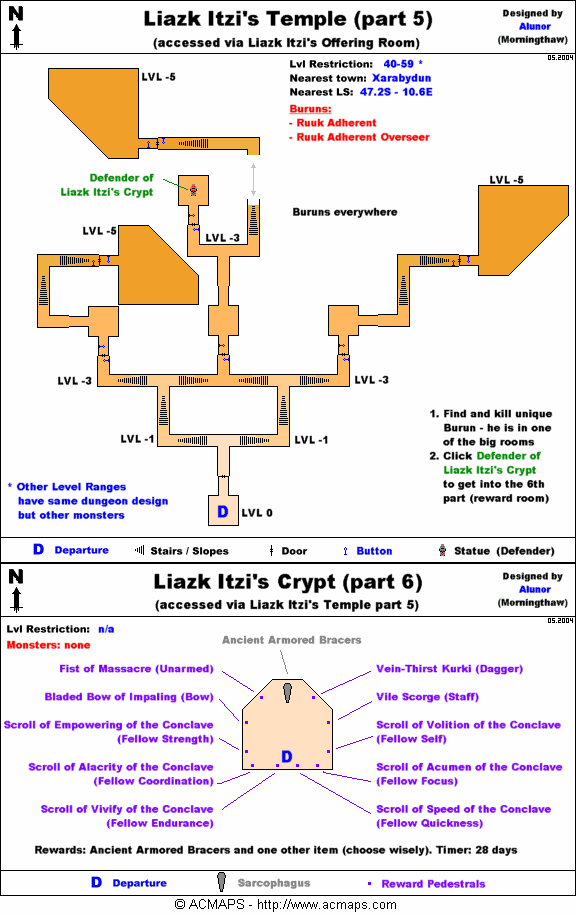
=== Part 5: Halls of Liazk Itzi === | |||
# This section is full of Burun. There are 3 larger rooms, one to the northwest, one to the north, and one to the northeast. A Special burun boss randomly spawns in one of these rooms. | |||
#* 40 - 59: [[Burun Ruuk Adherent]] & [[Burun Ruuk Adherent Overseer]] | |||
#* 60 - 79: [[Burun Ruuk Seer]] & [[Burun Ruuk Seer Watcher]] | |||
#* 80 - 99: [[Burun Ruuk Soothsayer]] & [[Burun Ruuk Adherent Officer]] | |||
#* 100+: [[Burun Ruuk Shaman]] & [[Burun Ruuk Shaman Keeper]] | |||
# Once the Burun boss is dead, use the statue in the the mid wing to be teleported to [[Liazk Itzi's Crypt]]. | |||
=== Part 6: Liazk Itzi's Crypt === | |||
# Claim your rewards in this section. Use the [[Sarcophagus of High Matriarch, Liazk Itzi]] to obtain the Bracers, and then use one of the other objects in the room to claim another reward. | |||
== | == Dungeons & Maps == | ||
{{Dungeon Table | |||
| Table Rows = | |||
{{Dungeon Maps | |||
| Dungeon = Antechamber of Liazk Itzi | |||
| Coordinates = 40.7S, 11.8E | |||
| Wiki Map File = | |||
| ACmaps ID = 6243 | |||
}} | |||
{{Dungeon Maps | |||
| Dungeon = Liazk Itzi Guardians | |||
| Coordinates = From [[Antechamber of Liazk Itzi]] | |||
| Wiki Map File = | |||
| ACmaps ID = 6244 | |||
}} | |||
{{Dungeon Maps | |||
| Dungeon = Lair of Liazk Itzi | |||
| Coordinates = From [[Liazk Itzi Guardians]] | |||
| Wiki Map File = | |||
| ACmaps ID = 6243 | |||
}} | |||
{{Dungeon Maps | |||
| Dungeon = Liazk Itzi's Offering Room | |||
| Coordinates = From [[Lair of Liazk Itzi]] | |||
| Wiki Map File = | |||
| ACmaps ID = 6244 | |||
}} | |||
{{Dungeon Maps | |||
| Dungeon = Halls of Liazk Itzi | |||
| Coordinates = From [[Liazk Itzi's Offering Room]] | |||
| Wiki Map File = | |||
| ACmaps ID = 6246 | |||
}} | |||
{{Dungeon Maps | |||
| Dungeon = Liazk Itzi's Crypt | |||
| Coordinates = From [[Halls of Liazk Itzi]] | |||
| Wiki Map File = | |||
| ACmaps ID = 6246 | |||
}} | |||
}} | |||
== Rewards == | |||
=== Items === | |||
{{Item Table|Caption=Main Reward | |||
| Ancient Armored Bracers | |||
}} | |||
[[Category:Quest]] | {{Item Table|Caption=(1) Additional Reward | ||
[[Category: | | Bladed Bow of Impaling | ||
| Fist of Massacre | |||
| Vein-Thirst Kukri | |||
| Vile Scourge | |||
| Scroll of Lesser Empowering the Conclave | |||
| Scroll of Empowering the Conclave | |||
| Scroll of Greater Empowering the Conclave | |||
| Scroll of Superior Empowering the Conclave | |||
| Scroll of Lesser Vivify the Conclave | |||
| Scroll of Vivify the Conclave | |||
| Scroll of Greater Vivify the Conclave | |||
| Scroll of Superior Vivify the Conclave | |||
| Scroll of Lesser Alacrity of the Conclave | |||
| Scroll of Alacrity of the Conclave | |||
| Scroll of Greater Alacrity of the Conclave | |||
| Scroll of Superior Alacrity of the Conclave | |||
| Scroll of Lesser Speed the Conclave | |||
| Scroll of Speed the Conclave | |||
| Scroll of Greater Speed the Conclave | |||
| Scroll of Superior Speed the Conclave | |||
| Scroll of Lesser Acumen of the Conclave | |||
| Scroll of Acumen of the Conclave | |||
| Scroll of Greater Acumen of the Conclave | |||
| Scroll of Superior Acumen of the Conclave | |||
| Scroll of Lesser Volition of the Conclave | |||
| Scroll of Volition of the Conclave | |||
| Scroll of Greater Volition of the Conclave | |||
| Scroll of Superior Volition of the Conclave | |||
}} | |||
== Images == | |||
<gallery widths=200px heights=200px perrow=3> | |||
File:Teaser 200404 WarCry.jpg| | |||
File:Teaser 200404 ACVault.jpg| | |||
File:Teaser 200404 C.jpg| | |||
File:Teaser 200404 D.jpg| | |||
File:The Temple of Liazk Itzi Live.jpg| | |||
</gallery> | |||
== Dialog == | |||
{{Dialog| | |||
;Guardian | |||
|Guardian tells you, "You have entered the sacred halls of Liazk Itzi, the sleeping High Matriarch of the lush and fertile Iktzil Delta. The High Matriarch sleeps and you are not of the spirits that make this temple their home. Your business then must be to bring the sacrifices that will awaken the High Matriarch and allow her to reclaim this land once more." | |||
|Guardian tells you, "Beyond the door that I guard are guardians of the tunnels that lead to her resting place. They stand vigil over the spirits who were tasked to defend her temple in her absence. You may prove yourself worthy of entrance to the halls beyond by answering the riddle she has devised." | |||
|Guardian tells you, "I shall act as arbiter for her and I am prepared to receive the answer that you will posit. Know this. Failure to answer this correctly will allow me to feed, and I am ever so hungry. Listen carefully, and hand me that which you believe is the answer to the High Matriarch's riddle only when you are certain. The High Matriarch wishes that the sacrifices brought to her are hers, and not mine." | |||
|Guardian tells you, "The riddle is as follows: Blood of flesh has sealed me and blood can see my locks undone. Though blood came first from opened flesh, the blood to see my joints unbound is found when ground is opened." | |||
;Handing in Dragonsblood | |||
|You give Guardian Dragonsblood. | |||
|Guardian tells you, "You have answered the riddle correctly and may pass through the door. The door will close within ten grains. Move quickly." | |||
}} | |||
== Update History == | |||
{{Update History| | |||
[[A New Threat]] | |||
* Quest introduced. | |||
[[The Quest for Freedom]] | |||
* Repeat timer changed from 27 days to 20 hours. | |||
}} | |||
[[Category:Quest Index]] | |||
[[Category:Quests: Level 40-59]] | |||
[[Category:Quests: Level 60-79]] | |||
[[Category:Quests: Level 80-99]] | |||
[[Category:Quests: Level 100]] | |||
[[Category:Fellowship Quests]] | |||
[[Category:Quests: 20 Hour Timer]] | |||
Latest revision as of 13:40, 5 November 2015
|
Temple of Ixir Zi - Temple of Liazk Itzi - Temple of Hizk Ri - Temple of Kivik Lir - Temple of Izji Qo |
| Walkthrough & Notes Dungeons & Maps Rewards Images Dialog Update History |
| The Temple of Liazk Itzi | |
|---|---|
| Level: | 40-59, 60-79, 80-99, 100 |
| Type: | Fellowship |
| Starts At: | Antechamber of Liazk Itzi at 40.7S, 11.8E |
| Route: | From Xarabydun or use a Fadsahil's Portal Gem |
| Repeat: | 20 Hours |
Overview
More commonly known as Blackmire 2, this quest has four level ranges: 40 - 59, 60 - 79, 80 - 99, and 100+
- If you are soloing this quest you must be in a fellowship to claim the reward at the end.
Prerequisites
- Before heading out, buy 1 Dragonsblood from your local archmage.
Walkthrough & Notes
- Use the Odd Looking Vine to be teleported into the Antechamber of Liazk Itzi.
Part 1: Antechamber of Liazk Itzi
- Hand your Dragonsblood to the statue and go through the door it opens.
- There are 4 statues. Use the one designated for your level range to be teleported into Liazk Itzi Guardians:
- Northwest - Levels 40 to 59
- Southwest - Levels 60 to 79
- Northeast - Levels 80 to 99
- Southeast - Levels 100 and up
Part 2: Liazk Itzi Guardians
- At the entrance, take the first right. From then on there is only one path to the end. The dungeon is full of a single type of Falatacot undead:
- 40 - 59: Grave Spirit
- 60 - 79: Crypt Spirit
- 80 - 99: Restless Soul
- 100+: Ancient Soul
- There are several doors opened by levers. The lever is always in the hallway very close to the door. Near the end you will come to a large room full of undead and two paths down. Both lead to the final room. Use the statue in this final room to be teleported to Lair of Liazk Itzi.
Part 3: Lair of Liazk Itzi
- There are two options - jump down a hole and run past/fight a gauntlet of Slithis, or complete a jumping puzzle to avoid the monsters. Should you fall in the jumping puzzle, you will land in pit lined with flying dagger traps. There is a lever in the north end of the pit room will open a door to the south, and once out of the pit you'll have to fight slithis to reach the end of this section.
- 40 - 59: Ithik Stalk
- 60 - 79: Irkith Stalk
- 80 - 99: Irkith Stalk ?
- 100+: Slithis Spthis
- After passing the jumping puzzle or creatures, use the statue at the intersection to be teleported to Liazk Itzi's Offering Room.
Part 4: Liazk Itzi's Offering Room
- This next area is a test of speed. The dungeon is small and contains no creatures. One person must use all three Eye statues fast enough to activate the Strange Device.
- Tip: After using an eye, jump to break the animation and exit the room before the door closes. Being in combat or casting mode when using the eye will achieve this effect as well.
- When the three eyes have been used fast enough, use the strange device and all members of the fellowship will be teleported to Halls of Liazk Itzi.
Part 5: Halls of Liazk Itzi
- This section is full of Burun. There are 3 larger rooms, one to the northwest, one to the north, and one to the northeast. A Special burun boss randomly spawns in one of these rooms.
- 40 - 59: Burun Ruuk Adherent & Burun Ruuk Adherent Overseer
- 60 - 79: Burun Ruuk Seer & Burun Ruuk Seer Watcher
- 80 - 99: Burun Ruuk Soothsayer & Burun Ruuk Adherent Officer
- 100+: Burun Ruuk Shaman & Burun Ruuk Shaman Keeper
- Once the Burun boss is dead, use the statue in the the mid wing to be teleported to Liazk Itzi's Crypt.
Part 6: Liazk Itzi's Crypt
- Claim your rewards in this section. Use the Sarcophagus of High Matriarch, Liazk Itzi to obtain the Bracers, and then use one of the other objects in the room to claim another reward.
Dungeons & Maps
| Dungeon | Coordinates | Wiki Map | ACmaps |
|---|---|---|---|
| Antechamber of Liazk Itzi | 40.7S, 11.8E | -- | 6243 |
| Liazk Itzi Guardians | From Antechamber of Liazk Itzi | -- | 6244 |
| Lair of Liazk Itzi | From Liazk Itzi Guardians | -- | 6243 |
| Liazk Itzi's Offering Room | From Lair of Liazk Itzi | -- | 6244 |
| Halls of Liazk Itzi | From Liazk Itzi's Offering Room | -- | 6246 |
| Liazk Itzi's Crypt | From Halls of Liazk Itzi | -- | 6246 |
Rewards
Items
![]() Bladed Bow of Impaling
Bladed Bow of Impaling![]() Fist of Massacre
Fist of Massacre![]() Vein-Thirst Kukri
Vein-Thirst Kukri![]() Vile Scourge
Vile Scourge![]() Scroll of Lesser Empowering the Conclave
Scroll of Lesser Empowering the Conclave![]() Scroll of Empowering the Conclave
Scroll of Empowering the Conclave![]() Scroll of Greater Empowering the Conclave
Scroll of Greater Empowering the Conclave![]() Scroll of Superior Empowering the Conclave
Scroll of Superior Empowering the Conclave![]() Scroll of Lesser Vivify the Conclave
Scroll of Lesser Vivify the Conclave![]() Scroll of Vivify the Conclave
Scroll of Vivify the Conclave![]() Scroll of Greater Vivify the Conclave
Scroll of Greater Vivify the Conclave![]() Scroll of Superior Vivify the Conclave
Scroll of Superior Vivify the Conclave![]() Scroll of Lesser Alacrity of the Conclave
Scroll of Lesser Alacrity of the Conclave![]() Scroll of Alacrity of the Conclave
Scroll of Alacrity of the Conclave![]() Scroll of Greater Alacrity of the Conclave
Scroll of Greater Alacrity of the Conclave![]() Scroll of Superior Alacrity of the Conclave
Scroll of Superior Alacrity of the Conclave![]() Scroll of Lesser Speed the Conclave
Scroll of Lesser Speed the Conclave![]() Scroll of Speed the Conclave
Scroll of Speed the Conclave![]() Scroll of Greater Speed the Conclave
Scroll of Greater Speed the Conclave![]() Scroll of Superior Speed the Conclave
Scroll of Superior Speed the Conclave![]() Scroll of Lesser Acumen of the Conclave
Scroll of Lesser Acumen of the Conclave![]() Scroll of Acumen of the Conclave
Scroll of Acumen of the Conclave![]() Scroll of Greater Acumen of the Conclave
Scroll of Greater Acumen of the Conclave![]() Scroll of Superior Acumen of the Conclave
Scroll of Superior Acumen of the Conclave![]() Scroll of Lesser Volition of the Conclave
Scroll of Lesser Volition of the Conclave![]() Scroll of Volition of the Conclave
Scroll of Volition of the Conclave![]() Scroll of Greater Volition of the Conclave
Scroll of Greater Volition of the Conclave![]() Scroll of Superior Volition of the Conclave
Scroll of Superior Volition of the Conclave
Images


Dialog
- Guardian
- Guardian tells you, "You have entered the sacred halls of Liazk Itzi, the sleeping High Matriarch of the lush and fertile Iktzil Delta. The High Matriarch sleeps and you are not of the spirits that make this temple their home. Your business then must be to bring the sacrifices that will awaken the High Matriarch and allow her to reclaim this land once more."
- Guardian tells you, "Beyond the door that I guard are guardians of the tunnels that lead to her resting place. They stand vigil over the spirits who were tasked to defend her temple in her absence. You may prove yourself worthy of entrance to the halls beyond by answering the riddle she has devised."
- Guardian tells you, "I shall act as arbiter for her and I am prepared to receive the answer that you will posit. Know this. Failure to answer this correctly will allow me to feed, and I am ever so hungry. Listen carefully, and hand me that which you believe is the answer to the High Matriarch's riddle only when you are certain. The High Matriarch wishes that the sacrifices brought to her are hers, and not mine."
- Guardian tells you, "The riddle is as follows: Blood of flesh has sealed me and blood can see my locks undone. Though blood came first from opened flesh, the blood to see my joints unbound is found when ground is opened."
- Handing in Dragonsblood
- You give Guardian Dragonsblood.
- Guardian tells you, "You have answered the riddle correctly and may pass through the door. The door will close within ten grains. Move quickly."
Update History
|