Lady Jaera's Tomb Quest: Difference between revisions
imported>Arkalor No edit summary |
imported>Arkalor (Door timers seem much longer now, and can easily be done solo) |
||
| Line 7: | Line 7: | ||
| Live Image = Lady Jaera's Tomb Quest Live.jpg | | Live Image = Lady Jaera's Tomb Quest Live.jpg | ||
| Live Image Caption = Lady Jaera's Tomb | | Live Image Caption = Lady Jaera's Tomb | ||
| Quest Type = Solo | | Quest Type = Solo | ||
| Kill Task = False | | Kill Task = False | ||
| Start Location = [[Al-Jalima]] | | Start Location = [[Al-Jalima]] | ||
| Line 28: | Line 28: | ||
}} | }} | ||
== Quest Overview == | == Quest Overview == | ||
In its heyday this quest offered great singularity level loot; however, recently it has been updated with more powerful creatures and a [[Braced Mana Forge Key]] | In its heyday this quest offered great singularity level loot; however, recently it has been updated with more powerful creatures and now the tomb contains Jaera's Wand, which can be handed in for a [[Braced Mana Forge Key]]. | ||
This quest involves lots of lever pulling | This quest involves lots of lever pulling, so it helps to scout the different areas first and view the map, otherwise it can get quite confusing. Lockpick is required for this quest. | ||
== Walk Through == | == Walk Through == | ||
==== The Burial Temple ==== | ==== Part 1: The Burial Temple ==== | ||
# Speak to [[Tazal al-Ashfai]] just outside of [[Al-Jalima]] at 6.1N, 3.5E. | '''This part is optional; if you don't want the 66 million xp, you can head straight to the [[Mage Academy]].''' | ||
# He will ask you to go to the [[Burial Temple]] at 8.5N, 6.0E and retrieve a black gem for him from the creature known as Kelannik. | # <font color=green>'''[Optional]'''</font> Speak to [[Tazal al-Ashfai]] just outside of [[Al-Jalima]] at 6.1N, 3.5E. | ||
# He will ask you to go to the [[Burial Temple]] nearby at 8.5N, 6.0E and retrieve a black gem for him from the creature known as Kelannik. | |||
# When inside the temple, take the east passage and jump down. Now head to the end of the corridor and through a false wall. At the intersection head straight on through a room with Skeletons and at the T junction take a right. | # When inside the temple, take the east passage and jump down. Now head to the end of the corridor and through a false wall. At the intersection head straight on through a room with Skeletons and at the T junction take a right. | ||
# In the next room go left and around to a lever, use it and then take the north passage continuing on through two rooms - take the first left down the ramp and open the door. You will come to another door that is now open, inside this room is [[Lord Kelannik (160)|Lord Kelannik]] and his two guards. | # In the next room go left and around to a lever, use it and then take the north passage continuing on through two rooms - take the first left down the ramp and open the door. You will come to another door that is now open, inside this room is [[Lord Kelannik (160)|Lord Kelannik]] and his two guards. | ||
| Line 41: | Line 42: | ||
# Hand Tazal the Black Gem for 66,000,000 experience and he will attempt to summon the portal Kelannik uses... | # Hand Tazal the Black Gem for 66,000,000 experience and he will attempt to summon the portal Kelannik uses... | ||
==== The Mage Academy ==== | ==== Part 2: The Mage Academy ==== | ||
'''Lockpick skill is needed for this part of the quest.''' | '''Lockpick skill is needed for this part of the quest. If you can open a 750 difficulty door then you can skip straight to part 2b.'''<br> | ||
===== Levers 1 | '''Route:''' From the [[Town Network]] head to [[Neydisa Castle]] (south hall) and then run to 74.7N, 18.5E. | ||
===== Part 2a: Levers 1 - 4 (Stone Key/Old Key) ===== | |||
# From the drop room make a mental note of the lever to your right for later and head down the ramp hugging the left wall. You need to take the third turn off to the east on level 6 (see map). | # From the drop room make a mental note of the lever to your right for later and head down the ramp hugging the left wall. You need to take the third turn off to the east on level 6 (see map). | ||
# You should come to a room with an [[Empyrean Statue]] and Masonry Golem behind a lever activated door. | # You should come to a room with an [[Empyrean Statue]] and Masonry Golem behind a lever activated door. | ||
# Leave this area and turn right heading southwest and then turn left at the T into a room with Zefirs. Kill the [[Xekrit Zefir Guardian]] for the [[Stone Key]]. | # Leave this area and turn right heading southwest and then turn left at the T into a room with Zefirs. Kill the [[Xekrit Zefir Guardian]] for the [[Stone Key]]. | ||
# Now head west down the hall to the room opposite with 3 levers. Hit the wall levers only (center lever #3 releases the Masonry Golem) and run back (left wall hug) to the ramp and up to the | # Now head west down the hall to the room opposite with 3 levers. Hit the wall levers only (center lever #3 releases the Masonry Golem) and run back (left wall hug) to the ramp and up to the portal drop room to pull that lever you saw earlier. | ||
# Now head down again, but this time take the second turn off to the west (level 4) and through the floor plate activated door. Take a right and then left into the corridor and joining room. | |||
# | # Kill the [[Banderling Smasher]]s here and loot the corpses until you find the [[Old Key]]. | ||
# | |||
===== | ===== Part 2b: Lever 5 and the Sewers ===== | ||
# | # Now you have the old key, run back to the ramp and head down and and unlock the wooden door for lever 4 (lvl 8 on the map). | ||
#* Note | #* Note: There are locked metal gates on either end of the corridor opposite this lever. The next lever (5) opens the large metal sewer doors in the room beyond. | ||
# | # Pull the lever and run back up the ramp to the third turn off with the Banderling Smasher. Turn right and then left and unlock the door using the old key. | ||
# Inside the next room is a gate that requires lockpicking and the door you just opened beyond that with the lever to door 5 and a Masonry Golem. | |||
# Pull lever 5 and run back to the gates near the wooden door. Unlock one of the gates and head into the sewer area. | |||
# Head east at the junction around to a locked metal door on your left - use the [[Cursed Key]] to open it. | # Head east at the junction around to a locked metal door on your left - use the [[Cursed Key]] to open it. | ||
# Go up the ramp and stick to the path ignoring all the smaller side rooms. You will cross bridges that pass through a number of areas, hop from the final ledge into the east passage and then jump down into a room with a surface portal and [[Zombie Mage]]. | # Go up the ramp and stick to the path ignoring all the smaller side rooms. You will cross bridges that pass through a number of areas, hop from the final ledge into the east passage and then jump down into a room with a surface portal and [[Zombie Mage]]. | ||
| Line 67: | Line 70: | ||
=== Short Version === | === Short Version === | ||
# Skip part 1 with the [[Burial Temple]] for the 66 million xp and make your way straight to the [[Mage Academy]]. | |||
#* '''Route:''' From the [[Town Network]] head to [[Neydisa Castle]] (south hall) and then run to 74.7N, 18.5E. | |||
# Jump up where it says ''"You may jump on monsters then on bridge from here"'' on the map to bypass the lever pulling and the majority of the quest. | # Jump up where it says ''"You may jump on monsters then on bridge from here"'' on the map to bypass the lever pulling and the majority of the quest. | ||
# Jump across south and then down past the portal, kill [[Rytheran's Apprentice (200)|Rytheran's Apprentice]] and loot Rytheran's key. | # Jump across south and then down past the portal, kill [[Rytheran's Apprentice (200)|Rytheran's Apprentice]] and loot Rytheran's key. | ||
Revision as of 15:52, 6 December 2010
Related topics: Jaera
| Walkthrough & Notes Dungeons & Maps Rewards Images Dialog Update History |
| Lady Jaera's Tomb Quest | |
|---|---|
| Level: | ?? |
| Type: | Solo |
| Starts At: | ?? |
| Repeat: | ?? |
Quest Overview
In its heyday this quest offered great singularity level loot; however, recently it has been updated with more powerful creatures and now the tomb contains Jaera's Wand, which can be handed in for a Braced Mana Forge Key.
This quest involves lots of lever pulling, so it helps to scout the different areas first and view the map, otherwise it can get quite confusing. Lockpick is required for this quest.
Walk Through
Part 1: The Burial Temple
This part is optional; if you don't want the 66 million xp, you can head straight to the Mage Academy.
- [Optional] Speak to Tazal al-Ashfai just outside of Al-Jalima at 6.1N, 3.5E.
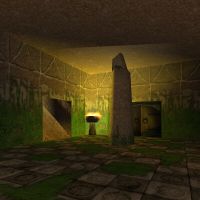
- He will ask you to go to the Burial Temple nearby at 8.5N, 6.0E and retrieve a black gem for him from the creature known as Kelannik.
- When inside the temple, take the east passage and jump down. Now head to the end of the corridor and through a false wall. At the intersection head straight on through a room with Skeletons and at the T junction take a right.
- In the next room go left and around to a lever, use it and then take the north passage continuing on through two rooms - take the first left down the ramp and open the door. You will come to another door that is now open, inside this room is Lord Kelannik and his two guards.
- Defeat Kelannik and loot the Black Gem and Cursed Key. Take the exit portal just outside the room and run back to Tazal al-Ashfai.
- Hand Tazal the Black Gem for 66,000,000 experience and he will attempt to summon the portal Kelannik uses...
Part 2: The Mage Academy
Lockpick skill is needed for this part of the quest. If you can open a 750 difficulty door then you can skip straight to part 2b.
Route: From the Town Network head to Neydisa Castle (south hall) and then run to 74.7N, 18.5E.
Part 2a: Levers 1 - 4 (Stone Key/Old Key)
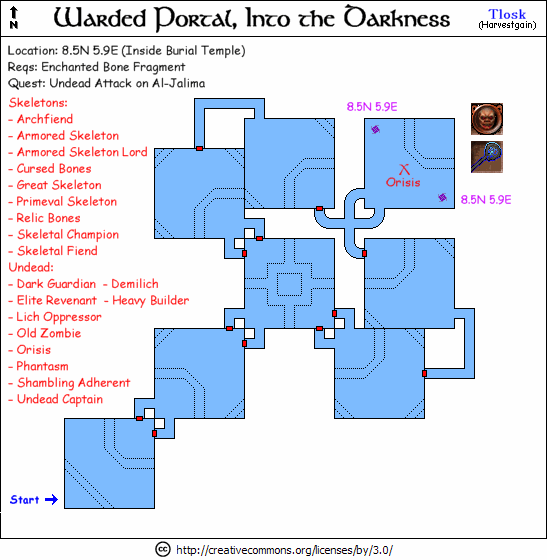
- From the drop room make a mental note of the lever to your right for later and head down the ramp hugging the left wall. You need to take the third turn off to the east on level 6 (see map).
- You should come to a room with an Empyrean Statue and Masonry Golem behind a lever activated door.
- Leave this area and turn right heading southwest and then turn left at the T into a room with Zefirs. Kill the Xekrit Zefir Guardian for the Stone Key.
- Now head west down the hall to the room opposite with 3 levers. Hit the wall levers only (center lever #3 releases the Masonry Golem) and run back (left wall hug) to the ramp and up to the portal drop room to pull that lever you saw earlier.
- Now head down again, but this time take the second turn off to the west (level 4) and through the floor plate activated door. Take a right and then left into the corridor and joining room.
- Kill the Banderling Smashers here and loot the corpses until you find the Old Key.
Part 2b: Lever 5 and the Sewers
- Now you have the old key, run back to the ramp and head down and and unlock the wooden door for lever 4 (lvl 8 on the map).
- Note: There are locked metal gates on either end of the corridor opposite this lever. The next lever (5) opens the large metal sewer doors in the room beyond.
- Pull the lever and run back up the ramp to the third turn off with the Banderling Smasher. Turn right and then left and unlock the door using the old key.
- Inside the next room is a gate that requires lockpicking and the door you just opened beyond that with the lever to door 5 and a Masonry Golem.
- Pull lever 5 and run back to the gates near the wooden door. Unlock one of the gates and head into the sewer area.
- Head east at the junction around to a locked metal door on your left - use the Cursed Key to open it.
- Go up the ramp and stick to the path ignoring all the smaller side rooms. You will cross bridges that pass through a number of areas, hop from the final ledge into the east passage and then jump down into a room with a surface portal and Zombie Mage.
- Here you find the library where Rytheran's Apprentice awaits. Defeat him and take Rytheran's Key and Sheets of Paper for translation. Now you have Rytheran's Key you need to make your way to Lady Jaera's Tomb.
- Use the surface portal and reenter the academy, go back to the room with the statue and the golem behind a lever door (third room down). Go south east and hug the left wall until you reach a room with pillars and a Black Coral Golem guarding a door.
- Kill the Golem and use the Stone Key on the door. There are lightning traps in this room, dispatch the two Golems here.
- Use Rytheran's Key on Lady Jaera's Tomb and loot Lady Jaera's Wand.
- Note: The tomb will cast Gossamer Flesh on you when opened.
- Bring the wand to Tazal al-Ashfai for 115,000,000 xp and a Braced Mana Forge Key.
Short Version
- Skip part 1 with the Burial Temple for the 66 million xp and make your way straight to the Mage Academy.
- Route: From the Town Network head to Neydisa Castle (south hall) and then run to 74.7N, 18.5E.
- Jump up where it says "You may jump on monsters then on bridge from here" on the map to bypass the lever pulling and the majority of the quest.
- Jump across south and then down past the portal, kill Rytheran's Apprentice and loot Rytheran's key.
- Kill the Xekrit Zefir Guardian for the Stone Key if you don't have lockpick (door is diff. 500), and unlock the door to the tomb room.
- Use Rytheran's Key on Lady Jaera's Tomb and loot Lady Jaera's Wand.
- Bring the wand to Tazal al-Ashfai for 115,000,000 xp and a Braced Mana Forge Key.
Maps
| Dungeon | Coordinates | Wiki Map | ACmaps |
|---|---|---|---|
| Burial Temple | 8.5N, 6.0E | -- | 013E |
| Mage Academy | 74.7N, 18.5E | -- | 0139 |
Items
![]() Black Gem
Black Gem![]() Cursed Key
Cursed Key![]() Stone Key
Stone Key![]() Old Key
Old Key![]() Rytheran's KeyFile:Sheets of Paper Icon.png Sheets of Paper
Rytheran's KeyFile:Sheets of Paper Icon.png Sheets of Paper![]() Lady Jaera's Tomb
Lady Jaera's Tomb![]() Lady Jaera's Wand
Lady Jaera's Wand
Experience Rewards
Images
-
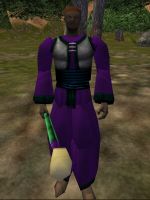
Tazal al-Ashfai
-
Burial Temple
-
Empyrean Statue and locked Golem
-
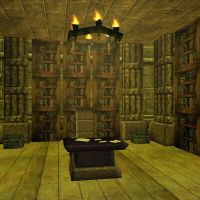
Rytheran's Library
-
Area with Lady Jaera's Tomb


Lore & Dialog
Speaking with Tazal al-Ashfai
- Tazal al-Ashfai tells you, "Hail, traveler. It is pleasant to meet anyone here in the wastes. Tell me, have you discovered a crypt in these regions called the Burial Temple?"
- Tazal al-Ashfai tells you, "I have heard that the dead walk there, and one in particular always carries a certain black gem I seek for my research."
- Tazal al-Ashfai tells you, "Through my studies, I have found that the dreadful creature is named Kelannik."
- Tazal al-Ashfai tells you, "Please retrieve this gem and return it to me. Your courage will not go unrewarded."
Giving Tazal al-Ashfai the Black Gem
- You give Tazal al-Ashfai Black Gem.
- Tazal al-Ashfai tells you, "Wonderful! Can you see the portal energy pulsing within it?"
- You've earned 66,000,000 experience.
- Tazal al-Ashfai tells you, "No doubt you have seen and experienced much on this adventure!"
- Tazal al-Ashfai tells you, "I have heard stories that the ancient dead of Dereth talk to each other as we do, and form a society underneath our own..."
- Tazal al-Ashfai says, "Let us see where this Kelannik fellow liked to travel."
- Tazal al-Ashfai tells you, "Why, I do believe that this portal leads to the Mage Academy! Beware young traveler, this place is not for the faint of heart..."
Rytheran's Apprentice
- A voice in your mind sneers, "Don't you people have anything better to do than bother me?"
- Rytheran's Apprentice blinks in surprise, then begins to chuckle at [Player Name]'s inept spellcasting!
Translating the Sheets of Paper
- You give Kuyiza bint Zayi the Translator Sheets of Paper.
- Kuyiza bint Zayi the Translator tells you, "Indeed, this is the runic script of old Dericost, a language not used in well over 5000 years... Save for this letter, which looks newly written..."
- Kuyiza bint Zayi looks slightly troubled.
- Kuyiza bint Zayi the Translator tells you, "This was found on Rytheran's Apprentice? It seems Rytheran is up to something involving that ancient graveyard and some book that was powerful enough to scare even the ancient Dericost into not using it."
- Kuyiza bint Zayi shudders
- Kuyiza bint Zayi the Translator tells you, "Here, see for yourself."
- Kuyiza bint Zayi the Translator gives you Rytheran's Letter.
Giving Lady Jaera's Wand to Tazal al-Ashfai
- You give Tazal al-Ashfai Lady Jaera's Wand.
- Tazal al-Ashfai tells you, "What a magnificent artifact to behold. I thought this item was destroyed ages ago."
- Tazal al-Ashfai tells you, "I must reward you greatly for this surprise gift!"
- You've earned 115,000,000 experience.
- Tazal al-Ashfai gives you Braced Mana Forge Key.
Rytheran's Apprentice (Retired)
- A voice in your mind sneers, "Oh for the throne and all that comes with it... Guards!
- You smite Rytheran's Apprentice mightily!
- The Dericost's body collapses into rot and dust, but a voice in your mind sneers, "Pathetic little wretch! I shall rise again soon enough."
Lord Rytheran (Retired)
- Lord Rytheran notices [Player Name] entering his sanctum, and rolls his rotting eyes in exasperation.
- You smite Lord Rytheran mightily!
- The Dericost lord's body collapses into rot and dust, but a voice in your mind sneers, "Pathetic little wretch! I shall rise again soon enough."
Translating a Letter (Retired)
- You give Kuyiza bint Zayi the Translator Letter.
- Kuyiza bint Zayi the Translator tells you, "Indeed, this is the runic script of old Dericost, a language not used in well over 5000 years. A moment - I shall transcribe a copy for you into Roulean."
- Kuyiza bint Zayi the Translator gives you A Letter.
- Kuyiza bint Zayi the Translator tells you, "There you are. This was gained from a powerful Revenant you say? He would appear to have been several millenia old! I wonder if there are others of his antiquity still walking Dereth?"
Notes
- During the A Small Victory event, the Burial Temple was updated with higher level creatures and the Skeleton Lord which originally dropped the Black Gem and Cursed Key was replaced with Lord Kelannik.
- During the Ancient Enemies event, Lord Rytheran moved to the Graveyard and was replaced with Rytheran's Apprentice.
- During the From Darkness, Light event, the following changes were made:
- The Burial Temple and Mage Academy were updated with higher level creatures and new level requirements of 150+.
- Lady Jaera's Tome no longer spawns low tier loot and now instead contains Lady Jaera's wand, which can be given in for 115 million xp and a braced mana forge key.
- Rewards prior to the update were 118,000 xp and random Tier 4 Loot.