Dream Reaver Investigation: Difference between revisions
imported>Sucamarto No edit summary |
imported>Darkmurkrow No edit summary |
||
| Line 13: | Line 13: | ||
| Level Restrictions = 200+ | | Level Restrictions = 200+ | ||
| Level Suggestions = 200+ | | Level Suggestions = 200+ | ||
| Contracts = | | Contracts = [[Contract for Behind the Mask]] | ||
| Item Rewards = 2 use [[Legendary Key]] | | Item Rewards = 2 use [[Legendary Key]] | ||
| Luminance Reward = 20,000 | | Luminance Reward = 20,000 | ||
Revision as of 14:25, 10 October 2013
| Walkthrough & Notes Dungeons & Maps Rewards Images Dialog Update History |
| Dream Reaver Investigation | |
|---|---|
| Level: | ?? |
| Type: | Solo/Group |
| Starts At: | ?? |
| Repeat: | ?? |
| Contracts: | Contract for Behind the Mask |
Quest Overview
The Vision of Horror in Yanshi has recruited you to discover the intentions of the Curator of Torment's intentions who continues to plot and scheme against the Reaver of Dreams.
Walk Through
- Optional: Talk to the Vision of Horror (Yanshi) in the back left tower in Yanshi.
- Head to the Masked Preface dungeon at 48.1S 10.7E (safe drop). The Dungeon cannot be tied to or recalled, but the Empyrean Ruins LS at 47.5S 10.5E is nearby.
- Route: Take the Serpent Hills Settlement portal at 49.3S 25.9E outside of Khayyaban
- Head (North) from the drop. You will be in a hall with 3 hallways,one heading (North), one heading to the (East) (blue braziers) and one to the (West) (red braziers). You will need the Sealed Key from each hallway to continue through the dungeon.
- Head (East) first past the red braziers and jump down, heading (South) again at the 1st split, and then bearing (East).
- Note: There is also a Chorizite Chest located in the East side of the dungeon.
- Turn (South) at the next bend, followed by an immediate right (West) into a large room.
- Continue through it to another large room with a Simulacrum Shifter. Kill the Simulacrum Shifter and loot the Sealed Crackling Key, then take the Masked Preface portal in the (South West) corner to return to the start of the Masked Preface dungeon.
- Note: the Sealed Crackling Key is 3 use, and expires in 24 hours.
- Head (North) from the drop again, but this time head (West) past the blue braziers.
- Jump down and follow the hall taking the second right turn (West).
- At the next intersection head left (south), then continue straight (North) down the hall.
- Eventually you will come to a large room with a Virindi Keeper. Kill the Virindi Keeper and loot the Sealed Sparkling Key before exiting through the Masked Preface portal to return to the start of the dungeon.
- Note: the Sealed Sparkling Key is 3 use, and expires in 24 hours.
- With both the Sealed Crackling Key and Sealed Sparkling Key you may now proceed (North) through the 2 Sealed Doors, Sealed Door 1 and Sealed Door 2.
- Note: the 2 Sealed doors stay open for a total of 3 minutes.
- Jump down and follow the hall taking the first right turn (North) and then following the hall and making your way through a several large rooms.
- From the 3rd large room you come to take (the first one with multiple exits), the (West) exit which leads into a large room.
- From the large room take the (North) exit to the Virindi Sentinel. Kill Virindi Sentinel and loot a Virindi Sentinel's Message Shard (he drops 9. They are on a 13 day pickup timer) then exit through the portal in the North West.
- Note: The Virindi Sentinel is on a 15 minute re-spawn timer.
- Hand the shard to the Vision of Horror (he will be in the dungeon) for your Xp, Luminance, and 2 use Legendary Key, then jump up to the north to loot the chests.
Maps
| Dungeon | Coordinates | Wiki Map | ACmaps |
|---|---|---|---|
| Masked Preface | 48.1S 10.7E | -- | -- |
Items
![]() Chorizite Chest
Chorizite Chest![]() Sealed Crackling Key
Sealed Crackling Key![]() Sealed Sparkling Key
Sealed Sparkling Key![]() Virindi Sentinel's Message Shard
Virindi Sentinel's Message Shard
Experience Rewards
Title Rewards
Images
Click image for full size version.
-

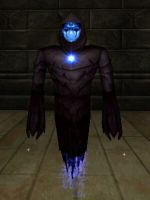
Simulacrum Shifter who drops the Sealed Crackling Key.
-
-

-

Sealed Door 1 Opened with the Sealed Crackling Key.
-

Sealed Door 2 Opened with the Sealed Sparkling Key.


_Live.jpg)
_Live.jpg)
Lore & Dialog
Vision of Horror tells you, "Greetings."
You allow Vision of Horror to examine your Virindi Sentinel's Message Shard.
You hand over 1 of your Virindi Sentinel's Message Shards.
The Vision of Horror takes the message shard from you and looks at you curiously.
Vision of Horror tells you, "Greetings. I don't believe I understand why you have given me this, but give me a moment to extract the stored message."
Vision of Horror tells you, "This is most disturbing! While I would normally be wary of revealing the contents of this shard, you have proven to be invaluable in its recovery and are most deserving to be informed."
Vision of Horror tells you, "I have translated the stored message into your language for you. I will inform the Reaver of Dreams of this latest revelation."
Vision of Horror tells you, "Please take these rewards and know the Reaver of Dreams is in your debt. Your assistance with the desert abductions and with this matter have prevented a great travesty by unveiling the cowardice, deception, and malice of the Curator of Torment."
Vision of Horror gives you Translated Message Shard.
You've earned 330,000,000 experience.
You've earned 20,000 Luminance.
Vision of Horror gives you Legendary Key.
Vision of Horror tells you, "Greetings warrior. We are most grateful for your aid in revealing the true intentions of the Curator of Torment."
You may repeat this quest in 12d 23h 59m 59s.
Notes
- ??