Essenceless Harbinger Quest: Difference between revisions
From Drunkapedia
imported>Arkalor's Bot No edit summary |
imported>John Bigboote m (→Walk Through) |
||
| Line 1: | Line 1: | ||
{{Links Header|Harbinger | {{Links Header|[[Harbinger Quest]]s<br> | ||
[[Weakened Harbinger Quest|Weakened Harbinger]] - Essenceless Harbinger - [[Empowered Harbinger Quest|Empowered Harbinger]] - [[Aerbax's Prodigal Harbinger|Prodigal Harbinger]]}} | [[Weakened Harbinger Quest|Weakened Harbinger]] - [[Essenceless Harbinger Quest|Essenceless Harbinger]] - [[Empowered Harbinger Quest|Empowered Harbinger]] - [[Aerbax's Prodigal Harbinger|Prodigal Harbinger]]}}<br> | ||
{{Quest Summary | {{Quest Summary | ||
| | | Patch Introduced = [[The Price of Loyalty]] | ||
| Quest Type = | | Related Quests = | ||
| | | Updated = | ||
| | | | ||
| | | Live Image = Live.jpg | ||
| | | Live Image Caption = | ||
| | | Quest Type = Group | ||
| Kill Task = False | |||
| Start Location = [[Old Yanshi]] | |||
| Timer = 27 Days | |||
| Level Restrictions = 60+ | |||
| Level Suggestions = 100+ | |||
| Contracts = | | Contracts = | ||
| Item Rewards = [[Shimmering Prismatic Oil]] | |||
| Luminance Reward = | |||
| Max XP Reward = 350 Million (1 point in Skill) | |||
| Titles = Harbinger's Bane | |||
| | |||
| Link Walk Through = True | |||
| Link Maps = True | |||
| Link Items = True | |||
| Link XP Rewards = True | |||
| Link Title Rewards = True | |||
| Link Images = True | |||
| Link Lore & Dialog = True | |||
| Link Notes = True | |||
}} | }} | ||
== Overview == | == Quest Overview == | ||
Quest to kill the Harbinger after it has been weakened by destroying | Quest to kill the Harbinger after it has been weakened by destroying the [[Essences of Magic]]. | ||
<font color=darkred>'''Important:'''</font> The Weakened, Essenceless and Empowered Harbinger quests all share timers for the free skill point and the [[Harbinger Arm Token]]. | |||
== | == Walk Through == | ||
* | * Make sure everyone from your fellow has a [[Harbinger Quest#Harbinger Item|Harbinger Item]] before starting. | ||
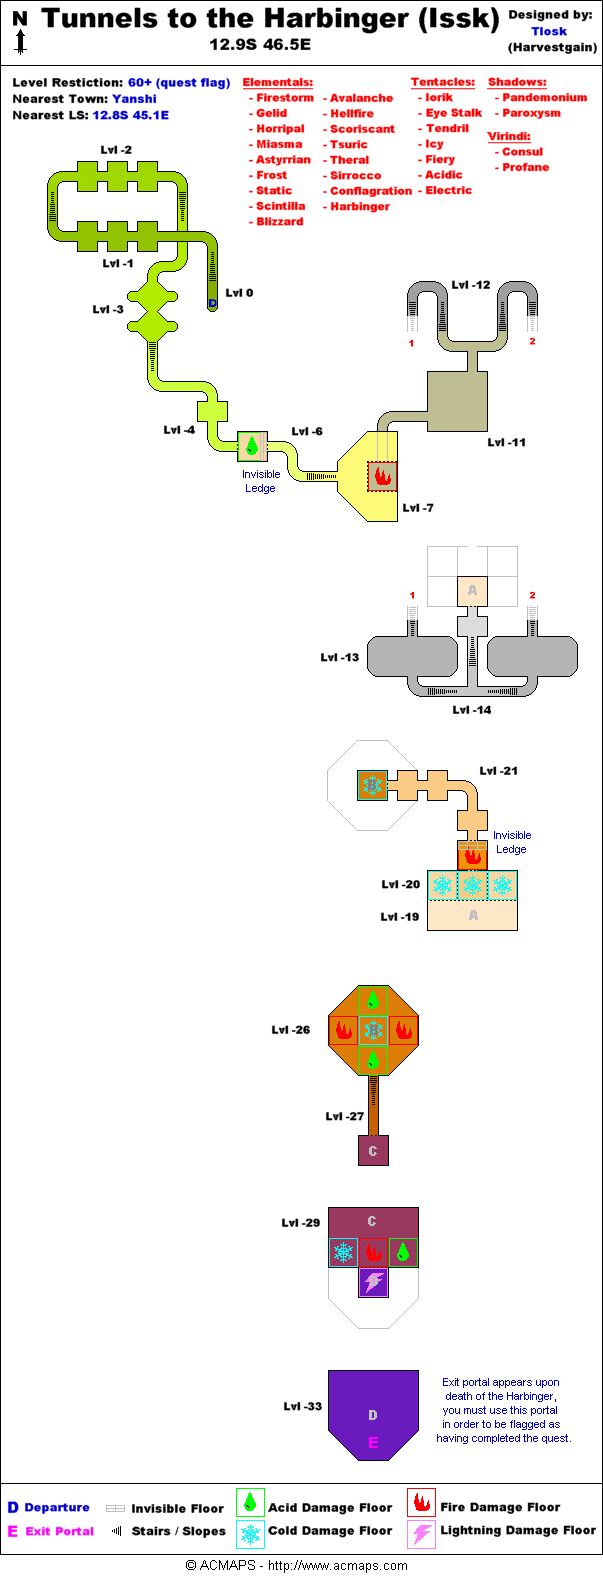
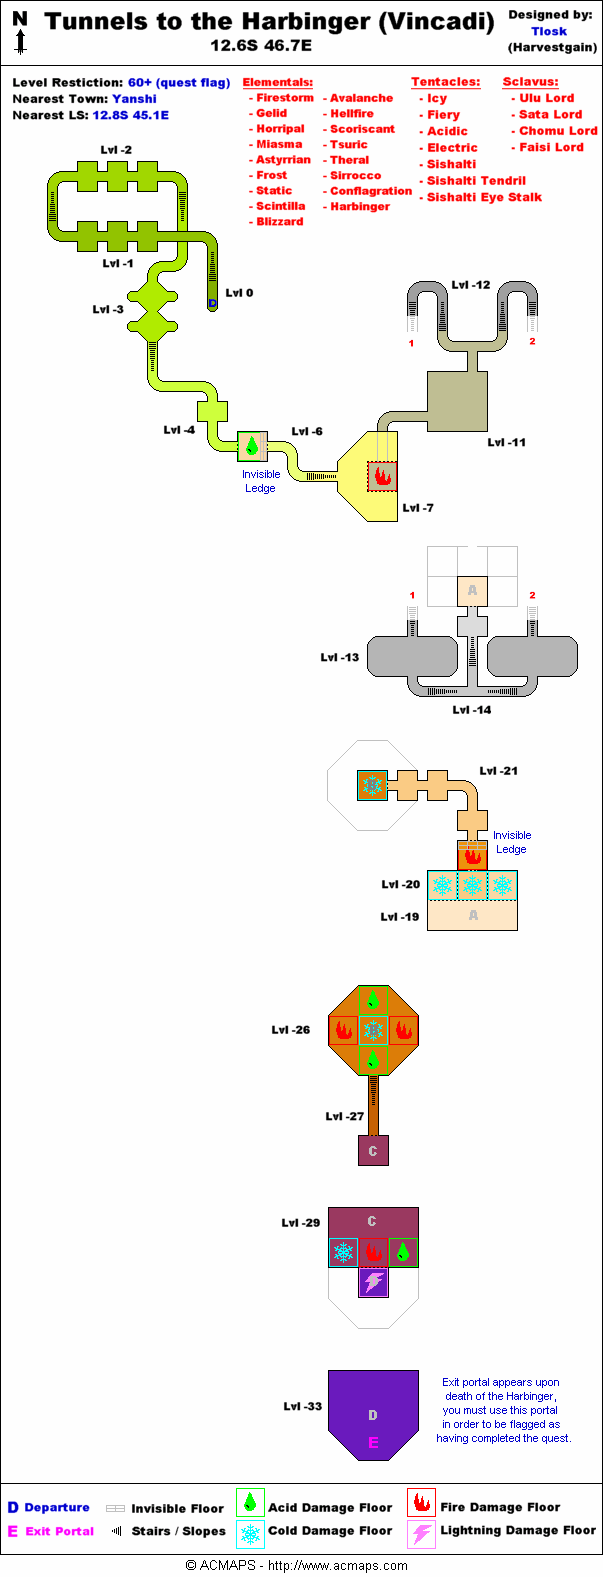
# From [[Yanshi]], run to either [[Issk]] @ 12.9S, 46.5E or [[Vincadi]] @ 12.6S 46.7E. | |||
#* '''Note:''' Each NPC offers the same quest, however the lore is different for each. Flagging with one will prevent you from accessing the other, so be sure your whole group flags with the same NPC. | |||
#* '''Tip:''' Soft tie to the surface portal @ 13.0S, 47.3E for convenience. If you die, you'll want an easy way to get back quickly. | |||
| | |||
#* Note: Each NPC offers the same quest, however the lore is different for each. Flagging with one will prevent you from accessing the other, so be sure your whole group flags with the same NPC. | |||
#* | |||
# When your group is ready, everyone should hand their [[Harbinger Item]] to the NPC (either [[Issk]] or [[Vincadi]]) and then use the nearby [[Tunnels to the Harbinger (Issk)|Tunnels to the Harbinger]] portal to begin. | # When your group is ready, everyone should hand their [[Harbinger Item]] to the NPC (either [[Issk]] or [[Vincadi]]) and then use the nearby [[Tunnels to the Harbinger (Issk)|Tunnels to the Harbinger]] portal to begin. | ||
# Once inside, the dungeon is linear to the bottom (keep heading down). The only obstacles are a series of 4 jumps that must be made. | # Once inside, the dungeon is linear to the bottom (keep heading down). The only obstacles are a series of 4 jumps that must be made. | ||
| Line 110: | Line 47: | ||
#* '''Jump 4: Ice/Acid Pit Combo''' - Dispell, then shift Jump down onto the ice shelf and '''quicky''' run to the edge and full jump across the acid pit (land on invisible platform). The ice ''hurts'', so be quick. | #* '''Jump 4: Ice/Acid Pit Combo''' - Dispell, then shift Jump down onto the ice shelf and '''quicky''' run to the edge and full jump across the acid pit (land on invisible platform). The ice ''hurts'', so be quick. | ||
#* '''Jump 5: Staging Area''' - Shift jump down and quickly move to the south (near the portals). | #* '''Jump 5: Staging Area''' - Shift jump down and quickly move to the south (near the portals). | ||
# Take the [[Essence Chamber]] Portal | # Take the [[Essence Chamber]] Portal. If you just want to reach the [[Dereth Exploration]] Marker, instead take the portal direct to Harbinger's Lair and skip to the last step. | ||
# Kill each of the 4 Essences, the [[Essence of Strife]], [[Essence of Enchantment]], [[Essence of Artifice]] and the [[Essence of Verdancy]] | # Kill each of the 4 Essences, the [[Essence of Strife]], [[Essence of Enchantment]], [[Essence of Artifice]] and the [[Essence of Verdancy]] | ||
# Each will drop multiple crystallized essences used in the [[Essence Recovery]] quest. | # Each will drop multiple crystallized essences used in the [[Essence Recovery]] quest. | ||
# After all 4 are killed, a portal will spawn to the [[Harbinger]]. | # After all 4 are killed, a portal will spawn to the [[Harbinger]]. | ||
# Kill the [[Harbinger]], loot a | # Kill the [[Harbinger]], loot a [[Harbinger Arm Token]], and take portal which spawns after he dies. | ||
==== Rewards ==== | |||
# Talk to [[Issk]] or [[Vincadi]] for experience and 1 point into your skill (depends on which [[Harbinger Quest#Harbinger Items|Harbinger item]] you used). | |||
# Hand the [[Harbinger Arm Token]] to the [[Emissary of Asheron (Yanshi)|Emissary of Asheron]] in old [[Yanshi]] for the title "Harbinger's Bane" | |||
# Alternatively, you can hand the [[Harbinger Arm Token]] to [[Ciandra]] for a vial of [[Shimmering Prismatic Oil]] used to upgrade a [[Diamond Shield]] or a [[Helm of the Elements]]. The oil can also be given back to Ciandra for 6,500,000? xp. | |||
== | == Maps == | ||
{{Dungeon Table | {{Dungeon Table | ||
| Table Rows = | | Table Rows = | ||
{{Dungeon Maps | {{Dungeon Maps | ||
| Dungeon = Tunnels to the Harbinger (Issk) | | Dungeon = Tunnels to the Harbinger (Issk) | ||
| Coordinates = 12.9S | | Coordinates = 12.9S 46.5E | ||
| Wiki Map File = | | Wiki Map File = | ||
| ACmaps ID = 6447 | | ACmaps ID = 6447 | ||
| Other Site Name = | |||
| Other Site Link = | |||
}} | }} | ||
{{Dungeon Maps | {{Dungeon Maps | ||
| Dungeon = Tunnels to the Harbinger (Vincadi) | | Dungeon = Tunnels to the Harbinger (Vincadi) | ||
| Coordinates = 12.6S | | Coordinates = 12.6S 46.7E | ||
| Wiki Map File = | | Wiki Map File = | ||
| ACmaps ID = 6446 | | ACmaps ID = 6446 | ||
| Other Site Name = | |||
| Other Site Link = | |||
}} | |||
}} | }} | ||
== Items == | |||
{{Item Table|Caption=Quest Items | |||
| Guide to Fighting the Harbinger | |||
| Harbinger Arm Token | |||
}} | }} | ||
{{Item Table|Caption=Rewards | |||
{{ | | Shimmering Prismatic Oil | ||
| | |||
}} | }} | ||
{{ | == Experience Rewards == | ||
| | |||
| | {{Quest Experience Table | ||
| Repeat Differs = False | |||
| | | Table Rows = | ||
| | {{Quest Task | ||
| Description = Talk to [[Issk]] or [[Vincadi]] after completing quest | |||
| Max XP = 350,000,000 | |||
| Percent of Level = | |||
| Level Cap = | |||
}} | |||
{{Quest Task | |||
| Description = Give the [[Shimmering Prismatic Oil]] to [[Ciandra]] | |||
| Max XP = | |||
| Percent of Level = | |||
| Level Cap = | |||
}} | |||
}} | }} | ||
{{Rewards Table | == Title Rewards == | ||
| | {{Title Rewards Table | ||
| Table Rows = | |||
{{Title | |||
| Title = Harbinger's Bane | |||
| Task = Hand the [[Harbinger Arm Token]] to the [[Emissary of Asheron (Yanshi)|Emissary of Asheron]] | |||
}} | |||
}} | }} | ||
== Images == | == Images == | ||
<gallery widths=200px heights=200px perrow=3> | <gallery widths=200px heights=200px perrow=3> | ||
File: | File:Prismatic Diamond Shield Live.jpg|Prismatic Diamond Shield | ||
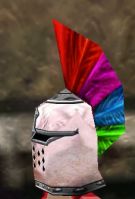
File: | File:Helm of the Elements Live.jpg|Greater Helm of the Elements | ||
</gallery> | </gallery> | ||
== Dialog == | == Lore & Dialog == | ||
'''Handing Ciandra a Harbinger Arm Token for the Shimmering Oil'''<br> | |||
:<font color=green>You give Ciandra, Arcanum Alchemist Harbinger Arm Token</font> | |||
:<font color=darkgoldenrod>"Ah, excellent, an arm from the Harbinger! You must have killed the Essences before you fought the Harbinger and retrieved this limb. You can tell by the lack of thaumic glow I've seen on the Essence bolstered Harbinger limbs. I can't wait to begin testing this! Here take this as a reward for helping to keep the Harbinger in check. Return it to me if you would prefer a less tangible reward."</font> | |||
:<font color=green>Ciandra, Arcanum Alchemist gives you Shimmering Prismatic Oil.</font> | |||
---- | |||
'''Applying shimmering oil to a diamond shield'''<br> | |||
<font color=green> | |||
= | :You apply the oil to the surface of the shield. The oil hardens into a hard prismatic crystalline shell. A soft glow surrounds the shield and storms become visible in the prismatic coating.</font> | ||
---- | |||
'''Applying prismatic oil to a piece of shadow armor'''<br> | |||
:<font color=green>You apply the oil to the surface of the armor. The oil hardens into a hard prismatic crystalline shell. A soft glow surrounds the coat and storms become visible in the prismatic coating.</font> | |||
== Notes == | |||
Latest revision as of 02:20, 20 December 2016
|
Weakened Harbinger - Essenceless Harbinger - Empowered Harbinger - Prodigal Harbinger |
| Walkthrough & Notes Dungeons & Maps Rewards Images Dialog Update History |
| Essenceless Harbinger Quest | |
|---|---|
| Level: | ?? |
| Type: | Group |
| Starts At: | ?? |
| Repeat: | ?? |
Quest Overview
Quest to kill the Harbinger after it has been weakened by destroying the Essences of Magic.
Important: The Weakened, Essenceless and Empowered Harbinger quests all share timers for the free skill point and the Harbinger Arm Token.
Walk Through
- Make sure everyone from your fellow has a Harbinger Item before starting.
- From Yanshi, run to either Issk @ 12.9S, 46.5E or Vincadi @ 12.6S 46.7E.
- Note: Each NPC offers the same quest, however the lore is different for each. Flagging with one will prevent you from accessing the other, so be sure your whole group flags with the same NPC.
- Tip: Soft tie to the surface portal @ 13.0S, 47.3E for convenience. If you die, you'll want an easy way to get back quickly.
- When your group is ready, everyone should hand their Harbinger Item to the NPC (either Issk or Vincadi) and then use the nearby Tunnels to the Harbinger portal to begin.
- Once inside, the dungeon is linear to the bottom (keep heading down). The only obstacles are a series of 4 jumps that must be made.
- Jump 1: Acid Pit - Full jump ahead (land on invisible platform)
- Jump 2: Lava Pit - Jump into the pit and take the hallway to the North
- Jump 3: Ice Shelf - Shift-jump down onto the platform above the ice shelf, clear the spawn, and wait for your group.
- Jump 4: Ice/Acid Pit Combo - Dispell, then shift Jump down onto the ice shelf and quicky run to the edge and full jump across the acid pit (land on invisible platform). The ice hurts, so be quick.
- Jump 5: Staging Area - Shift jump down and quickly move to the south (near the portals).
- Take the Essence Chamber Portal. If you just want to reach the Dereth Exploration Marker, instead take the portal direct to Harbinger's Lair and skip to the last step.
- Kill each of the 4 Essences, the Essence of Strife, Essence of Enchantment, Essence of Artifice and the Essence of Verdancy
- Each will drop multiple crystallized essences used in the Essence Recovery quest.
- After all 4 are killed, a portal will spawn to the Harbinger.
- Kill the Harbinger, loot a Harbinger Arm Token, and take portal which spawns after he dies.
Rewards
- Talk to Issk or Vincadi for experience and 1 point into your skill (depends on which Harbinger item you used).
- Hand the Harbinger Arm Token to the Emissary of Asheron in old Yanshi for the title "Harbinger's Bane"
- Alternatively, you can hand the Harbinger Arm Token to Ciandra for a vial of Shimmering Prismatic Oil used to upgrade a Diamond Shield or a Helm of the Elements. The oil can also be given back to Ciandra for 6,500,000? xp.
Maps
| Dungeon | Coordinates | Wiki Map | ACmaps |
|---|---|---|---|
| Tunnels to the Harbinger (Issk) | 12.9S 46.5E | -- | 6447 |
| Tunnels to the Harbinger (Vincadi) | 12.6S 46.7E | -- | 6446 |
Items
Quest Items
![]() Guide to Fighting the Harbinger
Guide to Fighting the Harbinger![]() Harbinger Arm Token
Harbinger Arm Token
Rewards
Experience Rewards
Title Rewards
Images
-

Prismatic Diamond Shield
-
Greater Helm of the Elements


Lore & Dialog
Handing Ciandra a Harbinger Arm Token for the Shimmering Oil
- You give Ciandra, Arcanum Alchemist Harbinger Arm Token
- "Ah, excellent, an arm from the Harbinger! You must have killed the Essences before you fought the Harbinger and retrieved this limb. You can tell by the lack of thaumic glow I've seen on the Essence bolstered Harbinger limbs. I can't wait to begin testing this! Here take this as a reward for helping to keep the Harbinger in check. Return it to me if you would prefer a less tangible reward."
- Ciandra, Arcanum Alchemist gives you Shimmering Prismatic Oil.
Applying shimmering oil to a diamond shield
- You apply the oil to the surface of the shield. The oil hardens into a hard prismatic crystalline shell. A soft glow surrounds the shield and storms become visible in the prismatic coating.
Applying prismatic oil to a piece of shadow armor
- You apply the oil to the surface of the armor. The oil hardens into a hard prismatic crystalline shell. A soft glow surrounds the coat and storms become visible in the prismatic coating.