Frore: Difference between revisions
imported>Widgeon (→Items) |
imported>Tlosk No edit summary |
||
| Line 1: | Line 1: | ||
{{Quest Summary | {{Quest Summary | ||
| Patch Introduced = [[Sudden Season]] | | Patch Introduced = [[Sudden Season]] | ||
| Updated = [[The Madness of Men]] | | Updated = [[The Madness of Men]], [[Reforging the Past]] | ||
| Related Quests = | | Related Quests = | ||
| Live Image = | | Live Image = | ||
| Line 8: | Line 8: | ||
| Kill Task = False | | Kill Task = False | ||
| Start Location = [[Bandit Castle]]/[[Plateau Village]] | | Start Location = [[Bandit Castle]]/[[Plateau Village]] | ||
| Timer = | | Timer = 27 days (Box and XP)<br>6 days (Hammer/Robe/Heueme) | ||
| Level Restrictions = 20+ | | Level Restrictions = 20+ | ||
| Level Suggestions = 55+ | | Level Suggestions = 55+ | ||
| Line 74: | Line 74: | ||
== Items == | == Items == | ||
{ | {{Item Table | ||
| Caption = Quest Items | |||
| Seal | |||
| Hasty Note | |||
| Brief Note | |||
| Quick Note | |||
| Bandit Rune Transcription | |||
| Neydisa Rune Transcription | |||
| Stonehold Rune Transcription | |||
| Partial Rune Transcription | |||
| Complete Rune Transcription | |||
| Gelidite Standing Stone Translation | |||
| | | Gelidite Treasure Key | ||
| Glowing Box | |||
}} | |||
{{Item Table | |||
| Caption = Rewards | |||
| Gelidite Robe | |||
| Hammer of Frore | |||
| Ice Heaume of Frore | |||
| | }} | ||
{{Item Table | |||
| Caption = Retired Items (no longer available) | |||
| | | Gelidite Robe (Retired) | ||
| Hammer of Frore (Retired) | |||
| Ice Heaume of Frore (Retired) | |||
| | | Tremblant's Ivory Staff | ||
}} | |||
| | |||
| | |||
| | |||
| | |||
| | |||
| | |||
| | |||
| | |||
| | |||
| | |||
| | |||
| | |||
| | |||
| | |||
| | |||
| | |||
== Images == | == Images == | ||
| Line 145: | Line 116: | ||
Kuyiza bint Zayi the Translator tells you, "Be warned, though - you will need a substantial party to reach the Lost City, and should you die..."<br> | Kuyiza bint Zayi the Translator tells you, "Be warned, though - you will need a substantial party to reach the Lost City, and should you die..."<br> | ||
Kuyiza bint Zayi the Translator tells you, "You will be unable to reenter the caves to recover your equipment. Be certain you are prepared before you ask Mairisa to cast the portal!"</font> | Kuyiza bint Zayi the Translator tells you, "You will be unable to reenter the caves to recover your equipment. Be certain you are prepared before you ask Mairisa to cast the portal!"</font> | ||
---- | |||
<font color=darkgoldenrod>Mairisa bint Fuda tells you, "I came here to be free of the madding pace of the Arcanum at Zaikhal. Unless you have urgent business, I'd prefer to be left to my meditation."</font><br> | |||
<font color=darkgoldenrod>Mairisa bint Fuda tells you, "If you are another seeking the lost City of Frore, be warned - you will need a substantial party to survive. Should you die, you will be unable to reenter the caves to recover your equipment. Be certain you are prepared."</font><br> | |||
---- | ---- | ||
<font color=green>You give Mairisa bint Fuda Gelidite Standing Stone Translation.<br> | <font color=green>You give Mairisa bint Fuda Gelidite Standing Stone Translation.<br> | ||
<font color=darkgoldenrod>Mairisa bint Fuda tells you, "Yes, I can provide transit to the location written here. I believe you will have need of this. A passing adventurer threw it at my head some time ago, when my portal spell fizzled."</font><br> | <font color=darkgoldenrod>Mairisa bint Fuda tells you, "Yes, I can provide transit to the location written here. I believe you will have need of this. A passing adventurer threw it at my head some time ago, when my portal spell fizzled."</font><br> | ||
Mairisa bint Fuda gives you Gelidite Treasure Key.</font> | Mairisa bint Fuda gives you Gelidite Treasure Key.</font> | ||
---- | |||
<font color=green>You give Mairisa bint Fuda Glowing Box.</font><br> | |||
<font color=darkgoldenrod>Mairisa bint Fuda tells you, "It can't be I thought this had been lost long ago...."</font><br> | |||
<font color=green>You've earned 18,000,000 experience.</font><br> | |||
<font color=green>Mairisa slowly opens the box, the golden glow washes across her face. Her facial expression seems to become more calm.</font><br> | |||
<font color=darkgoldenrod>Mairisa bint Fuda tells you, "Thank you kind adventurer, it was a kind gesture of yours to return this to it's rightful owner."</font><br> | |||
<font color=green>You must wait 26d 23h 43m 37s to retrieve the box again.</font><br> | |||
== Notes == | == Notes == | ||
* ?? | * ?? | ||
Revision as of 14:51, 12 January 2010
| Walkthrough & Notes Dungeons & Maps Rewards Images Dialog Update History |
| Frore | |
|---|---|
| Level: | ?? |
| Type: | Solo/Group |
| Starts At: | ?? |
| Repeat: | ?? |
Quest Overview
This quest requires Lockpicking skill to complete.
For each person that wants to loot the rewards chest, you will need to obtain a Gelidite Standing Stone Translation. Note that the translation is givable, so it is possible for the quest leader to acquire multiple copies using multiple characters ahead of time.
Walk Through
Rune Transcription
- Obtain a Seal from undead such as Lich Lords and Revenants.
- Go to Bandit Castle.
- Head to the nearby Bandit Castle Standing Stone at 66.1N, 51.4E.
- Use the Seal to unlock the standing stone and pick up the Bandit Rune Transcription. The nearby Hasty Note will lead you to Neydisa.
- Go to Neydisa Castle.
- Head to the nearby Neydisa Castle Standing Stone at 69.2N, 15.3E.
- Open the standing stone and pick up the Neydisa Rune Transcription. The nearby Brief Note will lead you to Stonehold.
- Go to Stonehold.
- Head to the nearby Stonehold Standing Stone at 72.0N, 22.0W.
- Open the standing stone and pick up the Stonehold Rune Transcription. The nearby Quick Note will hint at combining the transcriptions.
- Use the Bandit Rune Transcription on the Neydisa Rune Transcription to create the Partial Rune Transcription. Use the Stonehold Rune Transcription on the Partial Rune Transcription to create the Complete Rune Transcription.
- Bring the Complete Rune Transcription to Kuyiza bint Zayi the Translator in Zaikhal to obtain the Gelidite Standing Stone Translation. You are now ready to venture in to Frore.
Lost City of Frore
- With Gelidite Standing Stone Translations in hand, go to Plateau Village.
- Present your translation to Mairisa bint Fuda at 13.9N, 0.1E. She will give you the Gelidite Treasure Key and summon a portal to the top of the peak outside the Mountain Cavern.
- [NOTE] Everyone that wants to loot the reward chest must give Mairisa a translation. Do not take the portal if you have not turned yours in yet. Please allow Mairisa enough time to complete her interactions with each player before handing in translations. When everyone has their key, take the summoned portal.
- Enter the Mountain Cavern.
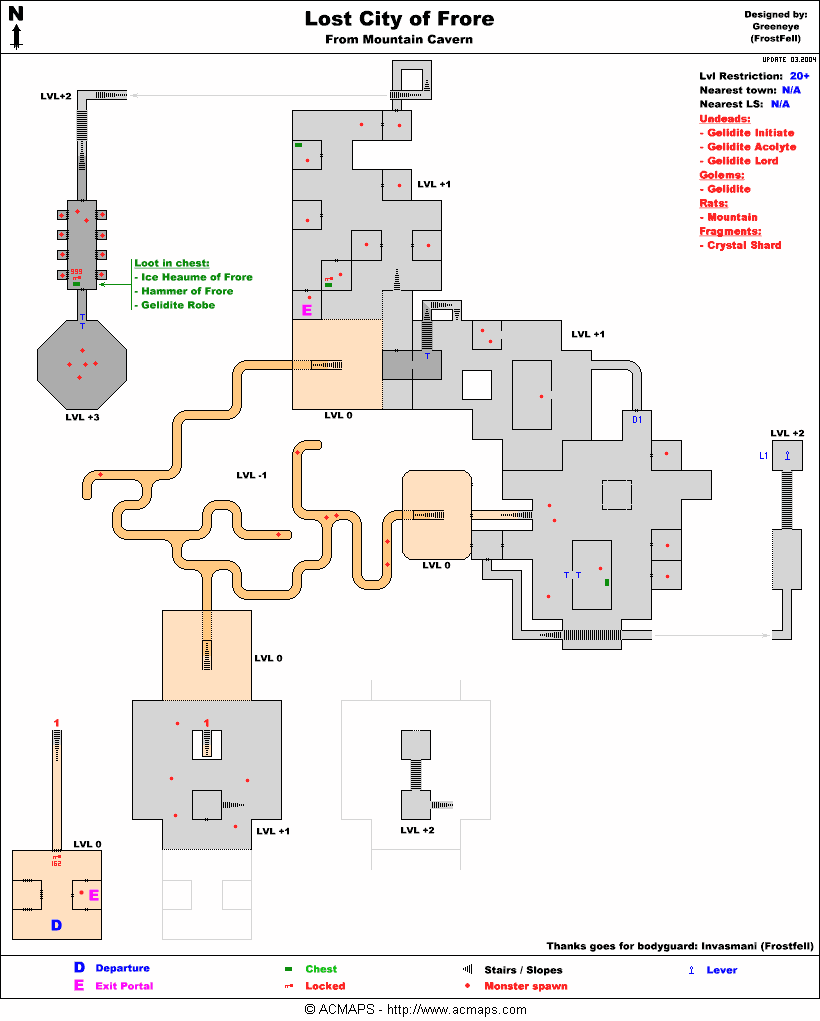
- Following the map, proceed to the Lost City of Frore portal. Note that the first area is a repetitive maze and can be easy to get lost in. You will need lockpick to advance passed the resistance 162 door. To open the lever doors, one must step on the three pressure plates that are found at the center of the three standing stone rings found in three larger cave chambers, located after the maze and before the city.
- When everyone is through, enter the Lost City of Frore.
- Open the locked door in the entrance with lockpick. Proceed up, jump down into the pit, and enter the hallway below. You will come to an intersection. If you have high enough jumping skill to jump up one dungeon level, take the left. If you do not, take the right. The right path is slightly longer and requires the use of one lever.
- Following the map, proceed to the end. The rewards chest is under a beam of light in the room just prior to the old crystal chamber. Clear the room and loot the chest for the Gelidite Robe, Hammer of Frore, and Ice Heaume of Frore. If you are with a group make sure to completely empty it.
Maps
| Dungeon | Coordinates | Wiki Map | ACmaps |
|---|---|---|---|
| Mountain Cavern | ?? | -- | 015D |
| Lost City of Frore | ?? | -- | 0138 |
Items
![]() SealFile:Hasty Note Icon.png Hasty Note
SealFile:Hasty Note Icon.png Hasty Note![]() Brief Note
Brief Note![]() Quick Note
Quick Note![]() Bandit Rune Transcription
Bandit Rune Transcription![]() Neydisa Rune Transcription
Neydisa Rune Transcription![]() Stonehold Rune Transcription
Stonehold Rune Transcription![]() Partial Rune Transcription
Partial Rune Transcription![]() Complete Rune Transcription
Complete Rune Transcription![]() Gelidite Standing Stone Translation
Gelidite Standing Stone Translation![]() Gelidite Treasure Key
Gelidite Treasure Key![]() Glowing Box
Glowing Box
![]() Gelidite Robe
Gelidite Robe![]() Hammer of Frore
Hammer of Frore![]() Ice Heaume of Frore
Ice Heaume of Frore
File:Gelidite Robe (Retired) Icon.png Gelidite Robe (Retired)File:Hammer of Frore (Retired) Icon.png Hammer of Frore (Retired)File:Ice Heaume of Frore (Retired) Icon.png Ice Heaume of Frore (Retired)![]() Tremblant's Ivory Staff
Tremblant's Ivory Staff
Images
-

Caption
-
Caption

_Icon.png)
_Icon.png)
_Icon.png)
Lore & Dialog
You give Kuyiza bint Zayi the Translator Complete Rune Transcription.
Kuyiza bint Zayi the Translator tells you, "Hm. This appears to be a portalspace coordinate. Such things are not within my knowledge. You might want to seek out my colleague Marisa bint Fuya."
Kuyiza bint Zayi the Translator tells you, "She would be able to cast a portal to this location. Unfortunately, she's on sabbatical, and has gone to the town of Plateau."
Kuyiza bint Zayi the Translator gives you Gelidite Standing Stone Translation.
Kuyiza bint Zayi the Translator tells you, "Be warned, though - you will need a substantial party to reach the Lost City, and should you die..."
Kuyiza bint Zayi the Translator tells you, "You will be unable to reenter the caves to recover your equipment. Be certain you are prepared before you ask Mairisa to cast the portal!"
Mairisa bint Fuda tells you, "I came here to be free of the madding pace of the Arcanum at Zaikhal. Unless you have urgent business, I'd prefer to be left to my meditation."
Mairisa bint Fuda tells you, "If you are another seeking the lost City of Frore, be warned - you will need a substantial party to survive. Should you die, you will be unable to reenter the caves to recover your equipment. Be certain you are prepared."
You give Mairisa bint Fuda Gelidite Standing Stone Translation.
Mairisa bint Fuda tells you, "Yes, I can provide transit to the location written here. I believe you will have need of this. A passing adventurer threw it at my head some time ago, when my portal spell fizzled."
Mairisa bint Fuda gives you Gelidite Treasure Key.
You give Mairisa bint Fuda Glowing Box.
Mairisa bint Fuda tells you, "It can't be I thought this had been lost long ago...."
You've earned 18,000,000 experience.
Mairisa slowly opens the box, the golden glow washes across her face. Her facial expression seems to become more calm.
Mairisa bint Fuda tells you, "Thank you kind adventurer, it was a kind gesture of yours to return this to it's rightful owner."
You must wait 26d 23h 43m 37s to retrieve the box again.
Notes
- ??