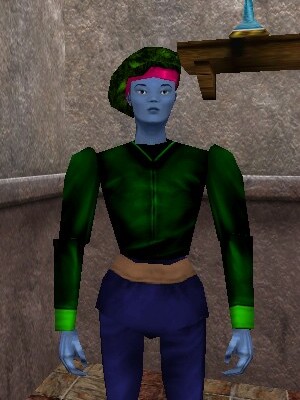
Healer (Westwatch): Difference between revisions
From Drunkapedia
imported>Sanddh mNo edit summary |
imported>Tlosk's Bot mNo edit summary |
||
| Line 1: | Line 1: | ||
[[ | [[File:Healer (Westwatch) Live.jpg|right|frame|Healer (Westwatch)]] | ||
'''Introduced in:''' [[Throne of Destiny (Expansion)]] | '''Introduced in:''' [[Throne of Destiny (Expansion)]] | ||
| Line 40: | Line 40: | ||
:{|border=0 cellpadding=5 | :{|border=0 cellpadding=5 | ||
|+'''Miscellanous''' | |+'''Miscellanous''' | ||
| | | {{Icon|Health Draught}} || [[Health Draught]] || | ||
| | | {{Icon|Potion of Healing}} || [[Potion of Healing]] || | ||
| | | {{Icon|Health Tincture}} || [[Health Tincture]] || | ||
|- | |- | ||
| | | {{Icon|Mana Draught}} || [[Mana Draught]] || | ||
| | | {{Icon|Mana Potion}} || [[Mana Potion]] || | ||
| | | {{Icon|Mana Tincture}} || [[Mana Tincture]] || | ||
|- | |- | ||
| | | {{Icon|Stamina Potion}} || [[Stamina Potion]] || | ||
| | | {{Icon|Stamina Tincture}} || [[Stamina Tincture]] || | ||
| | | {{Icon|Stamina Elixir}} || [[Stamina Elixir]] || | ||
|- | |- | ||
| | | {{Icon|Handy Healing Kit}} || [[Handy Healing Kit]] || | ||
| | | {{Icon|Adept Healing Kit}} || [[Adept Healing Kit]] || | ||
| | | {{Icon|Gifted Healing Kit}} || [[Gifted Healing Kit]] || | ||
|- | |- | ||
| | | {{Icon|Excellent Healing Kit}} || [[Excellent Healing Kit]] || | ||
| | | {{Icon|Peerless Healing Kit}} || [[Peerless Healing Kit]] || | ||
|- | |- | ||
|} | |} | ||
| Line 65: | Line 65: | ||
'''Services''' | '''Services''' | ||
:{|border=0 cellpadding=5 | :{|border=0 cellpadding=5 | ||
| | | {{Icon|Coordination Other I}} || [[Coordination Other I]] | ||
| | | {{Icon|Coordination Other II}} || [[Coordination Other II]] | ||
| | | {{Icon|Endurance Other I}} || [[Endurance Other I]] | ||
| | | {{Icon|Endurance Other II}} || [[Endurance Other II]] | ||
|- | |- | ||
| | | {{Icon|Focus Other I}} || [[Focus Other I]] | ||
| | | {{Icon|Focus Other II}} || [[Focus Other II]] | ||
| | | {{Icon|Quickness Other I}} || [[Quickness Other I]] | ||
| | | {{Icon|Quickness Other II}} || [[Quickness Other II]] | ||
|- | |- | ||
| | | {{Icon|Strength Other I}} || [[Strength Other I]] | ||
| | | {{Icon|Strength Other II}} || [[Strength Other II]] | ||
| | | {{Icon|Willpower Other I}} || [[Willpower Other I]] | ||
| | | {{Icon|Willpower Other II}} || [[Willpower Other II]] | ||
|- | |- | ||
|} | |} | ||
| Line 86: | Line 86: | ||
{|border=0 cellpadding=3 | {|border=0 cellpadding=3 | ||
|+'''Tradenotes''' | |+'''Tradenotes''' | ||
| | | {{Icon|Trade Note (100)}} || [[I Note]] | ||
| | | {{Icon|Trade Note (500)}} || [[V Note]] | ||
| | | {{Icon|Trade Note (1,000)}} || [[X Note]] | ||
| | | {{Icon|Trade Note (5,000)}} || [[L Note]] | ||
|- | |- | ||
| | | {{Icon|Trade Note (10,000)}} || [[C Note]] | ||
| | | {{Icon|Trade Note (50,000)}} || [[D Note]] | ||
| | | {{Icon|Trade Note (100,000)}} || [[M Note]] | ||
| | | {{Icon|Trade Note (150,000)}} || [[MD Note]] | ||
|- | |- | ||
| | | {{Icon|Trade Note (200,000)}} || [[MM Note]] | ||
| | | {{Icon|Trade Note (250,000)}} || [[MMD Note]] | ||
|- | |- | ||
|} | |} | ||
Revision as of 02:04, 4 June 2009

Introduced in: Throne of Destiny (Expansion)
| NPC Summary | |
|---|---|
| Name: | Healer |
| Title: | Healer |
| Race: | Female Viamontian |
| Location: | 72.8N 73.51W in Westwatch |
| Route: | Portals near Sanamar. |
| Currency: | Pyreals |
Healer tells you, "I have pledged to heal all, Viamontian or no. We may be enemies in this great conflict, but a healer is not a healer if he refuses to help another in need."
Healer tells you, "Good day, my friend."
Notes
- See Healer for other similar shopkeepers.
- Sells at 190%, buys at 70%.
Inventory
Services
| I Note | V Note | X Note | L Note | ||||
| C Note | D Note | M Note | MD Note | ||||
| MM Note | MMD Note |