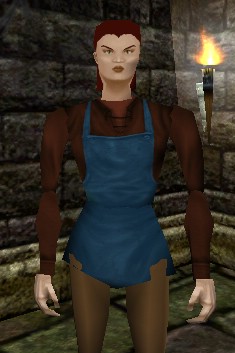
Healer Lithinia of Chiran: Difference between revisions
From Drunkapedia
imported>Sanddh m (→Inventory) |
imported>Tlosk's Bot mNo edit summary |
||
| Line 1: | Line 1: | ||
[[ | [[File:Healer Lithinia of Chiran Live.jpg|frame|Healer Lithinia of Chiran]] | ||
'''Introduced during''' [[??]]. | '''Introduced during''' [[??]]. | ||
| Line 38: | Line 38: | ||
'''Miscellanous''' | '''Miscellanous''' | ||
:{|border=0 cellpadding=5 | :{|border=0 cellpadding=5 | ||
| | | {{Icon|Health Draught}} || [[Health Draught]] || | ||
| | | {{Icon|Potion of Healing}} || [[Potion of Healing]] || | ||
|- | |- | ||
| | | {{Icon|Mana Draught}} || [[Mana Draught]] || | ||
| | | {{Icon|Mana Potion}} || [[Mana Potion]] || | ||
|- | |- | ||
| | | {{Icon|Stamina Potion}} || [[Stamina Potion]] || | ||
| | | {{Icon|Stamina Tincture}} || [[Stamina Tincture]] || | ||
|- | |- | ||
| | | {{Icon|Handy Healing Kit}} || [[Handy Healing Kit]] || | ||
| | | {{Icon|Adept Healing Kit}} || [[Adept Healing Kit]] || | ||
|- | |- | ||
|} | |} | ||
| Line 55: | Line 55: | ||
'''Services''' | '''Services''' | ||
:{|border=0 cellpadding=5 | :{|border=0 cellpadding=5 | ||
| | | {{Icon|Mana Boost Other I}} || [[Mana Boost Other I]] | ||
| | | {{Icon|Mana Boost Other II}} || [[Mana Boost Other II]] | ||
| | | {{Icon|Revitalize Other I}} || [[Revitalize Other I]] | ||
| | | {{Icon|Revitalize Other II}} || [[Revitalize Other II]] | ||
|- | |- | ||
| | | {{Icon|Heal Other I}} || [[Heal Other I]] | ||
| | | {{Icon|Heal Other II}} || [[Heal Other II]] | ||
| | | {{Icon|Regeneration Other I}} || [[Regeneration Other I]] | ||
| | | {{Icon|Regeneration Other II}} || [[Regeneration Other II]] | ||
|- | |- | ||
| | | {{Icon|Rejuvenation Other I}} || [[Rejuvenation Other I]] | ||
| | | {{Icon|Rejuvenation Other II}} || [[Rejuvenation Other II]] | ||
| | | {{Icon|Mana Renewal Other I}} || [[Mana Renewal Other I]] | ||
| | | {{Icon|Mana Renewal Other II}} || [[Mana Renewal Other II]] | ||
|- | |- | ||
| | | {{Icon|Willpower Other I}} || [[Willpower Other I]] | ||
| | | {{Icon|Willpower Other II}} || [[Willpower Other II]] | ||
| | | {{Icon|Focus Other I}} || [[Focus Other I]] | ||
| | | {{Icon|Focus Other II}} || [[Focus Other II]] | ||
|- | |- | ||
| | | {{Icon|Quickness Other I}} || [[Quickness Other I]] | ||
| | | {{Icon|Quickness Other II}} || [[Quickness Other II]] | ||
| | | {{Icon|Coordination Other I}} || [[Coordination Other I]] | ||
| | | {{Icon|Coordination Other II}} || [[Coordination Other II]] | ||
|- | |- | ||
| | | {{Icon|Strength Other I}} || [[Strength Other I]] | ||
| | | {{Icon|Strength Other II}} || [[Strength Other II]] | ||
| | | {{Icon|Endurance Other I}} || [[Endurance Other I]] | ||
| | | {{Icon|Endurance Other II}} || [[Endurance Other II]] | ||
|- | |- | ||
|} | |} | ||
| Line 91: | Line 91: | ||
{|border=0 cellpadding=3 | {|border=0 cellpadding=3 | ||
|+'''Tradenotes''' | |+'''Tradenotes''' | ||
| | | {{Icon|Trade Note (100)}} || [[I Note]] | ||
| | | {{Icon|Trade Note (500)}} || [[V Note]] | ||
| | | {{Icon|Trade Note (1,000)}} || [[X Note]] | ||
| | | {{Icon|Trade Note (5,000)}} || [[L Note]] | ||
|- | |- | ||
| | | {{Icon|Trade Note (10,000)}} || [[C Note]] | ||
| | | {{Icon|Trade Note (50,000)}} || [[D Note]] | ||
| | | {{Icon|Trade Note (100,000)}} || [[M Note]] | ||
| | | {{Icon|Trade Note (150,000)}} || [[MD Note]] | ||
|- | |- | ||
| | | {{Icon|Trade Note (200,000)}} || [[MM Note]] | ||
| | | {{Icon|Trade Note (250,000)}} || [[MMD Note]] | ||
|- | |- | ||
|} | |} | ||
Revision as of 07:27, 2 June 2009

Introduced during ??.
| NPC Summary | |
|---|---|
| Name: | Healer Lithinia of Chiran |
| Title: | Healer |
| Race: | Female Aluvian |
| Location: | Underground City |
| Route: | See Underground City |
| Currency: | Pyreal |
Healer Lithinia of Chiran tells you, "Welcome."
Notes
- See Healer for other similar shopkeepers.
- Sells at 135%, buys at 90%.
Inventory
Miscellanous
Health Draught Potion of Healing Mana Draught Mana Potion Stamina Potion Stamina Tincture Handy Healing Kit Adept Healing Kit
Services
| I Note | V Note | X Note | L Note | ||||
| C Note | D Note | M Note | MD Note | ||||
| MM Note | MMD Note |