Gear Crossbow Quest
| Walkthrough & Notes Dungeons & Maps Rewards Images Dialog Update History |
| Gear Crossbow Quest | |
|---|---|
| Level: | ?? |
| Type: | Solo/Group |
| Starts At: | ?? |
| Time to Complete: | 30 min |
| Repeat: | ?? |
Quest Overview
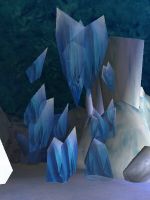
Find the Frozen Gearknight in the Frozen Cave dungeon and free him by slaying the Frozen Glacial Golem for xp and a Gear Crossbow. The dungeons has no level req but is very dangerous for all but the highest level characters, including high damage cold winds and frozen slurry floors. Mages should use their Chilling Ebony Staff if they have one to make it impossible to be cold vulned.
Walk Through
- There are no known NPC associated with this quest, just head to Fiun Outpost and run west to the Frozen Cave at 93.5N 60.5W.
- Route: Short run west of Fiun Outpost. Because it is easy to die in this dungeon, you may want to tie to the surface portal just inside the Ruschk Iceberg dungeon to the north at 96.3N 60.0W.
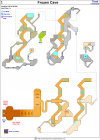
- Overview: This is a fairly simple dungeon consisting of a series of tunnels between levels, and several frozen ledges/bridges that criss-cross back and forth over a large chasm with a high damage floor at the very bottom. Fortunately, with a little bit of jumping expertise, traversing the entire dungeon is quick and easy. Before attempting jumps, however, please note that jumping in this dungeon is risky due to high damage winds that can easily kill you if you are cold vulned (a near constant condition due to the frost elementals that spam wars and vulns). If you do not have a Chilling Ebony Staff equipped, be sure to dispel any cold vulns before each jump.

METHOD 1: Jumps (Skip killing walls)
- From the entrance, proceed to jump down the first small chasm to the first level below. Head South out of the room, then cross the bridge over the chasm into a small chamber with 4 golems and a Wall of Ice - ignore all of them. (The golems should not attack you; if they do, you may simply cross back over the bridge and they will quickly return to their slumber).
- Once all of the elementals from the first room have left you alone, walk back onto the bridge and angle your camera view to see the level directly beneath it. There are 2 small shelves directly below the bridge you are standing on, each protruding just beyond the width of your bridge.
- Use a very small jump to drop down to either one of the shelves below, then cross over to the East. From there, head North following the East wall a short way down to the next level.
- Remain in the middle of this hallway (before the bend leading to the next room) while you dispell, heal up, and clear out any elementals that may be blocking your path or which have followed you from the previous level.
- Once you are safe, exit the hallway and proceed to the ledge directly West of you. Jump down a short way to the larger shelf directly below you, and immediately hug the East wall (underneath the ledge you just jumped down from) to avoid elementals dropping down on you from above. Dispell, heal, kill anything that may have stuck to you.
- Once safe again, head to the West wall on your shelf to get a better view. Look South-east; you will see the next level below you and a medium distance across the chasm from where you are. This is your target. Read on to see what to do if you miss, then jump across to the next level.
- IF YOU MISS your jump and fall to the bottom, quickly head back toward the direction of the shelf, and approach the SOUTH side. AVOID the area directly underneath the shelf you jumped from, as you will take heavy cold damage. From here, you can shift jump back up to the rock pillars/outcropping above you - be sure to aim between any two pillars to make sure you "stick."
- Once off the chasm floor, you can then do a full jump directly to your target (doable with 500 buffed jump, but probably not much below that).
- Note that, for some jumpers, this three-step process may actually be an easier way to make the final jump across - but beware possible cold damage!
- Done with the jumps! From here, head North to another room, then to a winding hallway leading to the final area. It is recommended that you remain in this hallway until you know what to do in the last area. See below.
METHOD 2: Killing Walls (Skip jumps)
- Other than the big jump at the very start, you can avoid the other jumps by killing Walls of Ice (normal damage) and Frozen Stone Walls (life bolt rings, immune to other damage, stand near door so rings hit door, if you stand close you can get up to 3 hits per cast).
- The quickest (fewest Walls to kill) way is to proceed North from the entrance and bear Right at the split, then proceed through as normal, bearing East and South after the first Wall of Ice. Note that golems near each Wall will become aggressive once you begin attacking, so be careful.
- It is recommended that you remain in the final windy hallway before the last large room until you know what to do in the last area. See below.
Final Area: Frozen Glacial Golem & Gear Knights
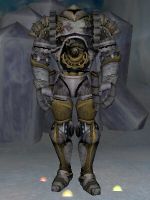
- Near the very end of the dungeon you'll come to a large down-sloping room with a large ice overhang that is on both sides and the ceiling at the bottom of the slope. Under the overhang (where the path narrows just before the Frozen Glacial Golem) is a floor trap that spawns approximately half a dozen Gear Knights. There are two general ways to complete the quest from this point, but be sure to read the next section before attempting either:
- Walk on the trap to trigger the Gear Knight spawn, kill them all and the Frozen Glacial Golem will die automatically, causing the Frozen Gearknight to change from ethereal to a killable creature.
- Jump over the trap and kill the Frozen Glacial Golem yourself (pull him to the side for the best chance at avoiding issues). Once dead, the Frozen Gearknight changes from ethereal to a killable creature.
- Important tip for mages and archers: after spawning the Gear Knights, it is possible to jump behind the Frozen Glacial Golem for protection; you will be safe from melee attacks on the far wall behind it (but NOT spells!), and can pick off the Gear Knights one by one with relative impunity.
- In either case, once the Frozen Glacial Golem is dead and the Frozen Gearknight becomes attackable, do regular damage to break the ice around the it and the NPC Ordas Myr will immediately appear in the same spot. Speak to him for xp and the crossbow. Ordas will disappear after a few minutes, so if you have party members who need to make their way back after dying, it is best to wait to break the ice around the Frozen Gearknight until they have returned safely.
- This quest can sometimes bug: if the ice around the frozen Gear Knight doesn't become attackable after the golem dies, have everybody in the fellow(s) log out for 5 min. Then all come back to repeat the process (kill gear knights or golem) until it works.
Video
<youtube>4-hNgjg5cF4</youtube>
Maps
| Dungeon | Coordinates | Wiki Map | ACmaps |
|---|---|---|---|
| Frozen Cave | 93.5N 60.5W | -- |
Items
Experience Rewards
Images
Click image for full size version.
Lore & Dialog
You obliterate Frozen Gearknight!
Ordas Myr tells you, "Please, tell me, when is it? I was frozen, solid."
Ordas Myr tells you, "Many years ago I lost track of time. We Gearknights normally keep perfect time."
Ordas Myr tells you, "The intense cold must have effected me."
Ordas Myr tells you, "I must thank you for freeing me from the ice."
Ordas Myr tells you, "Accept this crossbow, they are granted to our bravest warriors."
Ordas Myr gives you Gear Crossbow.
Ordas Myr gives you 10 Adventurer's Tokens.
You've earned 150,000,000 experience.
You've earned 15,000 Luminance. (Level 275)
Ordas Myr tells you, "As the ice froze around me I found myself thinking I would never be free again."
Ordas Myr tells you, "Thank you for freeing me from this icy prison."
Notes
- When released the transition from ethereal and encased in ice to killable creature for the Frozen Gearknight is unreliable. It is supposed to occur when the Frozen Glacial Golem is either killed directly, or dies indirectly as a result of killing all the Gear Knights that spawn from the nearby floor trap. As a consequence you may need to kill the golem more than once (the transition is brief so check right away).
- The NPC does not indicate the length of the repeat timer, it hasn't been determined what it is yet (the quest is repeatable though).
- The color of the xbow is random, colors found so far include black, gold and orange.

